PageBuilder Editor: Linking 101
There are many opportunities to reuse a block or chain that has already been configured and belongs to a published page or template. This action is called linking. You will want to link a block or chain if:
1) the desired configuration of that block or chain already lives on a published page/template, and
2) you want the ability to edit the block or chain from the parent page or template and have those edits inherited by other pages/templates where the block or chain is linked.
One common use case for linking is the Nav Bar. The parent page serves as the primary owner of the content, while the child page pulls that content from the parent page. Published updates from the parent page will automatically flow through to the linked block or chain.
Note
In the following documentation:
“Page” stands for both page and template unless differences in the behavior for pages and templates are explicitly called out.
“Block” stands for block, chain, and chained block unless differences in the behavior for each are explicitly called out.
Linkable and Linked
A block on a page available for other pages to link is called a linkable block. This page is referred to as the parent page. The block on another page linked to this linkable block on the parent page is called a linked block, and the page with the linked block or chain is referred to as the child page.
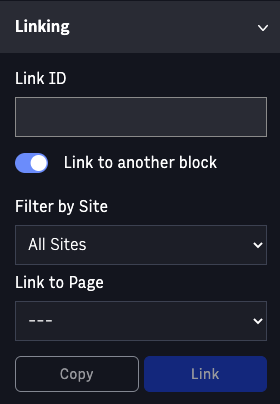
Linking Card
Within the Curate Workspace, when you click a block, in the block configuration, you see the Linking card along the left side of the screen. There are two linking options available to you:
Ability to make this block linkable, for instance, available to blocks on other pages for linking
Ability to link this block to another block, for instance, enabling this block to be linked to a block on another parent page
You cannot select both options, as this will create a hierarchical linking that PageBuilder doesn’t support. You can either make your block linkable or linked at any given point.
By default, the toggle is on (green) to link to another linkable Block.
 |
How to create a linkable block
If you have a preferred block on your site, such as a Nav Bar, Masthead, or any other common page element, you may want to reuse these elements across multiple pages on your site. To do so—and to avoid recreating these blocks for each individual page—you must make these blocks linkable.
To create a linkable block, click the blocks—for example, Global Nav Bar—in the Curate Workspace on your page.
Within the Linking card, toggle off the Link to another block option.
Define the Link ID.
Go to Publish workspace and click Share & Publish. This block will now be available on other pages to link.
Unless the Link ID is set and the parent page is published, this block will not be available for linking to other pages.
Notes:
This Link ID is separate from the Block Display Name (displayed on the Blocks card and Details card in Block configurations) and will help you identify this linkable block more easily throughout your pages.
On a given page or template, Link ID should be unique. If you create a Link ID for a block or chain which already exists for a block on the page, you will see an error message prompting you to update the Link ID. If you do not update it, your Link ID for that block will be removed to ensure that you do not have any duplicates.
If you change a block’s Link ID, the linkage with any other pages will be broken. Read more about removing a Link ID below.
You can have multiple linkable blocks on a parent page, for example, Nav Bar, Masthead, global footer. One recommended linking approach is creating a fragments page with all the commonly used linkable blocks across your pages.
A linkable block from a parent page or fragments page can be linked to multiple child pages. For example, both Entertainment and Food Space Pages can have a Nav Bar linked to the same linkable Global Nav Bar from Global Fragments Page.
A child page can link to multiple linkable blocks of the same parent page or different parent pages. For example, Entertainment Page can have two linked blocks - Nav Bar linked to Global Nav Bar and Footer linked to Global Footer from the same Global Fragments parent page, or Nav Bar linked to Global Nav Bar from Global Fragments Page and Top Stories Feed from Homepage Feed Block from Homepage.
How to create a linked block
Once you have created a linkable Global Nav Bar block as described above, you can now link blocks on other Pages to it. Suppose you want to create a linked Nav Bar block on the Entertainment Page.
There are two ways in which you can create a linked block.
On the Entertainment Page, go to the Curate Workspace and click “Add Block” in the Layout zone (e.g page-header) where you would like to add the Block.
The Add Block or Chain from modal will open, and you will click the Other Pages tab. You can use Filter by Site to view relevant Pages and Templates and search for linkable blocks. All the linkable blocks from the selected Page will be listed by their Link IDs. To learn more about filtering for Linking functionality, see Filtering for Linking.
Scroll to find the Link ID you established for Global Nav Bar and click on the three-dot (…) on the block you want to link to. You will have two options: “Add as Link” and “Add as Copy”. Refer to the next section to learn more about copying.
Click on “Add as Link” and you will have a new linked Nav Bar block added to My Draft of the Entertainment Page.
You will be taken to block configurations to update any additional configurations of this newly linked block. In the Linking card, you’ll see the toggle is on (green) and the Link to Page and Link to Block drop-down fields will be set to reflect your linkable block.
When you are ready to publish, go to the Publish Workspace and click on “Share & Publish” so that the linked block is available in the Shared Draft and Published and the parent Page also knows that Entertainment Page is one of its child Pages.
Start by adding a block in the Layout Zone you would like. For example, click on Add Block or Chain from, then select “Nav Bar” from the Block Library tab.
In the Block configurations of the Nav Bar block, go to the Linking card.
The “Link to another Block” toggle is on (green) by default. Set the appropriate Filter by Site (if applicable) and select the Page from Link to Page drop-down, where the desired linkable Global Nav Bar exists.
Link IDs of all linkable blocks on the selected Page are listed as options in Link to Block dropdown. Select the linkable Global Nav Bar you are looking for.
Click on the Link button.
As mentioned in option 1, you must Publish this child Page in order to link Nav Bar to the Global Nav Bar.
You may have an existing block, say Footer, on your page that you want to link to linkable Global Footer on the Global Fragments Page or update to link from Small Footer to Global Footer.
Click on the block in the Curate Workspace.
In the Linking card, the Link to another block toggle is on (green) by default. Set the appropriate Filter by Site (if applicable) and select the Global Fragments Page from Link to Page menu, where the desired linkable Global Footer exists and then Link to Block to Global Footer.
Click on the Link button.
As mentioned in option 1, you must Publish this child Page in order to link Footer to Global Footer.
"Add as Link" versus "Add as Copy"
PageBuilder Editor provides you with options when it comes to linking Blocks.
As described in the options above, “Add as Link” and “Add as Copy” will be available on the Others tab on Add Block or Chain from modal and Linking card as Link and Copy buttons.
If you want to link to a linkable block and have the linked block on the child Page update with the parent, select “Add as Link”. When you “Add as Link”:
The displayed text on the block in the block card will be the Display Name of the linkable block on the parent page.
An arrow icon will appear on the linked block on the child page in the Blocks card in the Curate Workspace. Clicking on this icon will take you to the parent page, in case you wish to make any updates.
When you use the other option—”Add as Copy”— that is copying and not linking. Think of copying as a one-time transaction.
Use “Add as Copy” if you want to utilize the formatting and configuration of the linkable block but wish to sever the link between the linkable and linked blocks so that updates to the linkable block on the parent page do not affect the linked block on the child. When you “Add as Copy”:
The displayed text on the block in the Blocks card will be the Display Name of the linkable block on the parent page from which this block is copied.
The arrow icon will not appear next to the block in the Blocks card.
Breaking a Link
If you no longer want to have a link established between blocks, there are two primary ways to break these links.
If you want to sever the link between a specific linked block and the corresponding linkable block, start in the Curate Workspace of the child page and click on the linked block in the Blocks card. In the Linking card, you can either:
Turn the toggle “Link to another Block” off (grey), and the link details will be removed or
Update the details to link to a different linkable block.
The link between the original linked and linkable block will be broken, although the block remains on the page for you to edit.
If you want to sever the link between a linkable block on the parent page and its corresponding linked blocks on all the child pages, start in the Curate Workspace of the parent page and click on the linkable block in the Blocks card. In the Linking card, you can either:
Turn on the toggle “Link to another block” (green) or
Update the Link ID for the linkable block in the Linking card and the link between the parent and child Pages for this block will be broken.
Note
If you change the Link ID back to the original Link ID, all links will be re-established upon Publish.
What should I know about the parent/child relationship?
A single parent page/ global fragments page can have a maximum of 500 child pages linked to it. This is to ensure that organizations can effectively update pages and avoid service disruptions.
When you make changes to the linkable block on the parent page and Publish, all the child pages with blocks linked to this linkable block will be able to see the changes in the Shared Draft. So, when you sync My Draft with the Shared Draft or Use Shared, your linked block will have the latest and greatest updates from the linkable block.
You should not have to make any changes to the linked block (other than Display Name probably), but if you make any changes, know that all those changes will be lost when the linkable block on the parent Page is updated and Published, and you get those changes through the Shared Draft on your child Page. Before creating a linked block on the child Page, consider carefully if you need/want to link the block or just copy it.
When child pages are associated with any of the linkable blocks on the parent page, and the parent is Published, a modal will be displayed with all the child pages that will be affected when the parent page is published. Once you confirm, all the updates will be pushed to the Shared Draft of the child pages, and the linked block changes will be Published. Any other changes from Shared Draft will not be Published automatically.
If a child Page has multiple versions, say Entertainment has Entertainment and Entertainment special edition as its two versions, and Entertainment is the currently Published version, the linked block (for example, “Nav Bar”), if present on both versions, will be updated in the Shared Draft when the parent (for example, “Global Fragments”) Page is Published. But only Entertainment version will be Published.
When a parent page is Published, the Published version of the child page containing the linked block is also Published. Page History in the Info Workspace on the child page also displays any published pages on the parent page.
Linking tips
If the element is linked, an arrow icon appears next to the block in the Blocks card in the Curate Workspace on the child page. Click the arrow to open the parent page and make the necessary changes. Remember that if you edit the parent page block, all other pages where the block is linked will inherit those updates once the updates are published.
The page where a block was created must be published to ensure it can be linked to another page. Any changes to the block will also need to be Published for other pages to inherit those changes.
Changing the Link ID of the linkable block on the parent page automatically breaks the link to any and all child pages.
When linking, it’s best to start out with a brand new block or wipe out the name from the previously existing block so that the linked block name automatically flows in.
Linking Best Practices
PageBuilder Editor's current architecture supports a maximum of 500 pages linked to a single parent/global fragments page. This limit helps our users develop sustainable linking practices. To help your organization incorporate effective linking strategies and best practices, consider the following best practices.
Manage linkable blocks based on site or block similarities. If your organization heavily relies on linking and currently only uses one Global Fragment page, we recommend splitting up your links across multiple global fragment pages. One way to do this may be breaking down your fragments page based on sites or blocking similarities to manage it effectively. Another option is to create a single page for each linkable fragment. Both options ensure that when the Global Fragments page is published, it only republishes the minimum number of linked pages versus potentially republishing the entire website.
Improve block bundle through the creation of new React component. If you have a block that is nearly identical but renders differently based on the website it displays on, instead of depending on linking to power these changes, you should consider creating a React component in your block bundle with a variable that can be rendered through Site Properties. Through this method, your block will be dynamically replaced within the site-specific value during rendering, and you can utilize other platform capabilities that may be better suited to your needs.
Minimize the use of raw HTML blocks. Instead of using raw HTML to implement custom functionality, you may want to create a React component in your block bundle that implements the required HTML/JS/CSS, especially if you embed images directly into the raw HTML block. There is a hard limitation for the layout configuration of a rendered page, so when an image is directly embedded into the raw HTML block as a data URL, the limit is greatly exceeded, and the update cannot go into effect. By creating a component, this will ensure that the linked page is updated on the live site.