Using Identity and Subscription blocks
Identity and Subscription blocks can be used together to create a front-end experience powered by Arc Subscriptions on the back-end. The Identity and Subscription blocks contain a set of PageBuilder Theme blocks that can be used together or independently to create your desired user registration and paywall experiences. You can use them as-is or as a starting point to customize by Ejecting A Themes Block.
Important
Before using Identity and Subscription blocks, you must create a new build with the correct configurations for Identity blocks. To learn more, see Arc XP Identity Theme blocks configuration & customization deep dive.
Identity Block Overview
The Identity block package consists of Arc Blocks that can configure the sign-up and log-in experiences for accessing walled content. It manages the end-user aspects of signing up (registering/creating an account), logging in, and managing a user account. It is easy to create the following experiences using the corresponding block included in the Identity block package:
Experience/Functionality | Arc Block(s) in PageBuilder |
|---|---|
Sign Up / Sign In buttons in the Navigation bar | Identity Header Account - Arc Block |
Signing up for a new account with an email address | Identity Sign Up - Arc Block, Identity - Sign, Identity Log In Links - Arc Block |
Logging in with an existing account with an email address | Identity Log In - Arc Block, Identity Log In Links - Arc Block |
Creating a new account or logging into an existing account using a social account (Google, Apple ID, or Facebook) | Identity Social Sign On - Arc Block |
Resetting a forgotten password at Log In | Identity - Forgot Password Arc Block, Identity - Reset Password Arc Block |
Changing my email address or password on a Profile page | Account Management - Profile |
Identity Blocks in PageBuilder:
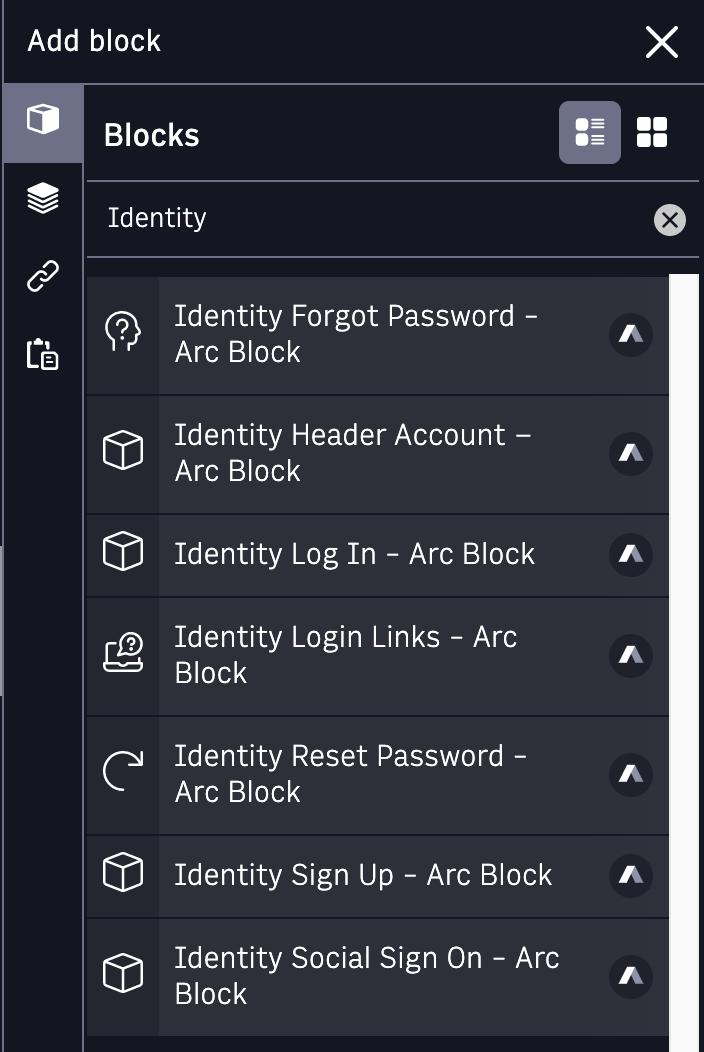 |
The Identity Arc Blocks are used to create several new pages (Sign Up, Log In, My Account, Forgot Password, Reset Password) and update the Navigation chain.
Creating a Sign Up and Log In Experience
Arc Theme Blocks make it easy to create Sign-up and Log-in experiences so that your users can register and log in to an account. Users can register with an email address and password combination or using a third-party social account. Currently, Theme Blocks supports Facebook and Google third-party authentication providers.
First, set up a Sign Up Page using the Identity - Sign Up block to get started.
Identity - Sign Up - Arc Block
The Identity Sign Up block is placed on a page where a user will create a new account.
First, create the Sign Up page:
In PageBuilder, click Create Page.
Set Page Name as
Account - Sign UpSet Page URI as
/account/signup/In the Setup tab, under Layout, select
Single Column - Arc LayoutIn the Curate tab, add the
Identity Sign Up - Arc Blockto the main section
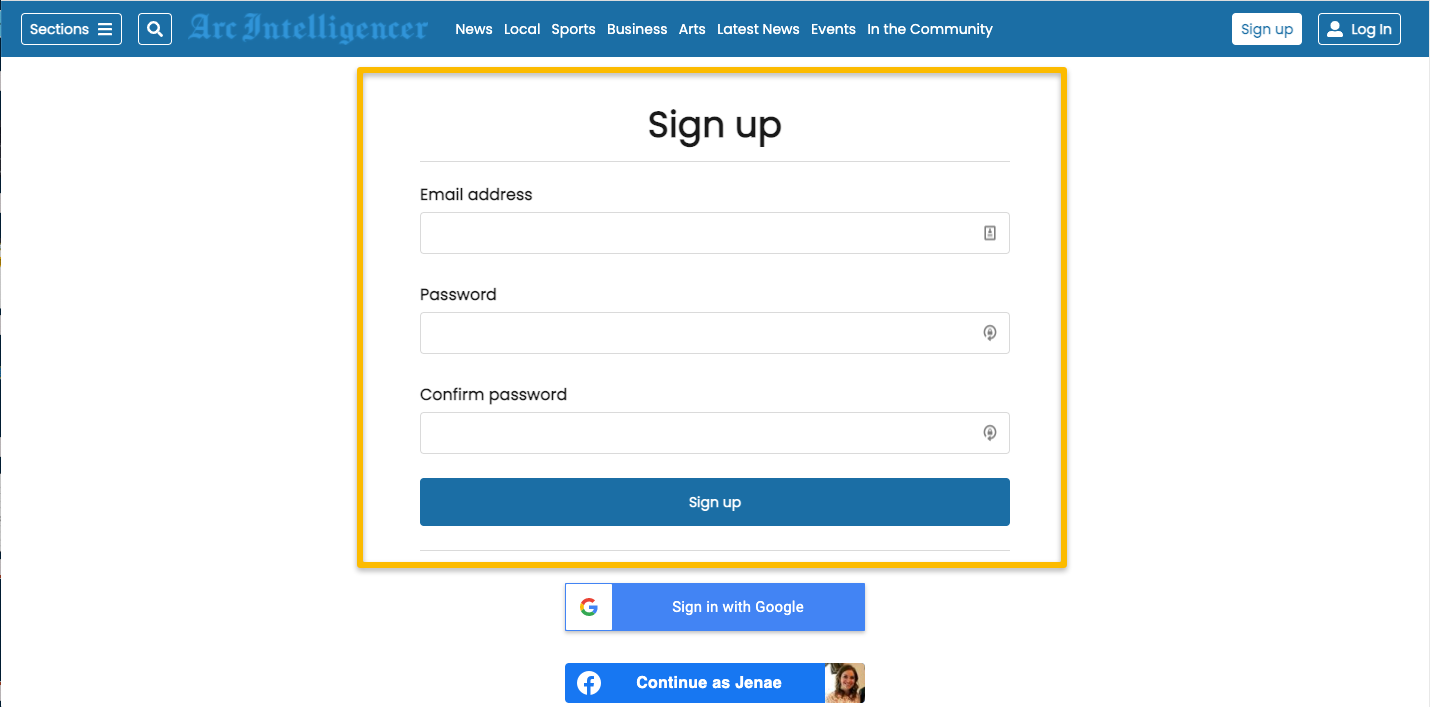
After publishing the Sign Up page, a user will be able to sign up with an email address and password.
Sign Up Block Example
 |
Custom Fields
The Identity Sign Up block includes the following Custom fields that an admin can configure:
The URL to which a user returns upon successful sign-up is set to “/” by default, returning the user to the homepage.
The option to send the user back to the page they were on. This redirect is not supported for SPA-enabled (Single Page Application) sites.
 |
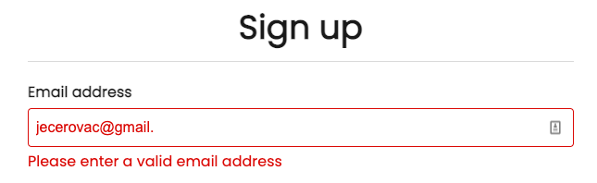
Validation Examples
The Sign Up block includes error states for valid email address format, minimum password requirements (as defined in Subscriptions settings), and matching password confirmation.
Valid e-mail address required
 |
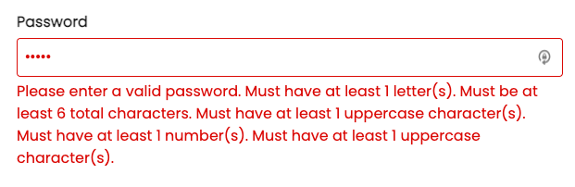
Password requirements (as defined in Subscriptions settings)
 |
Confirm password validation
 |
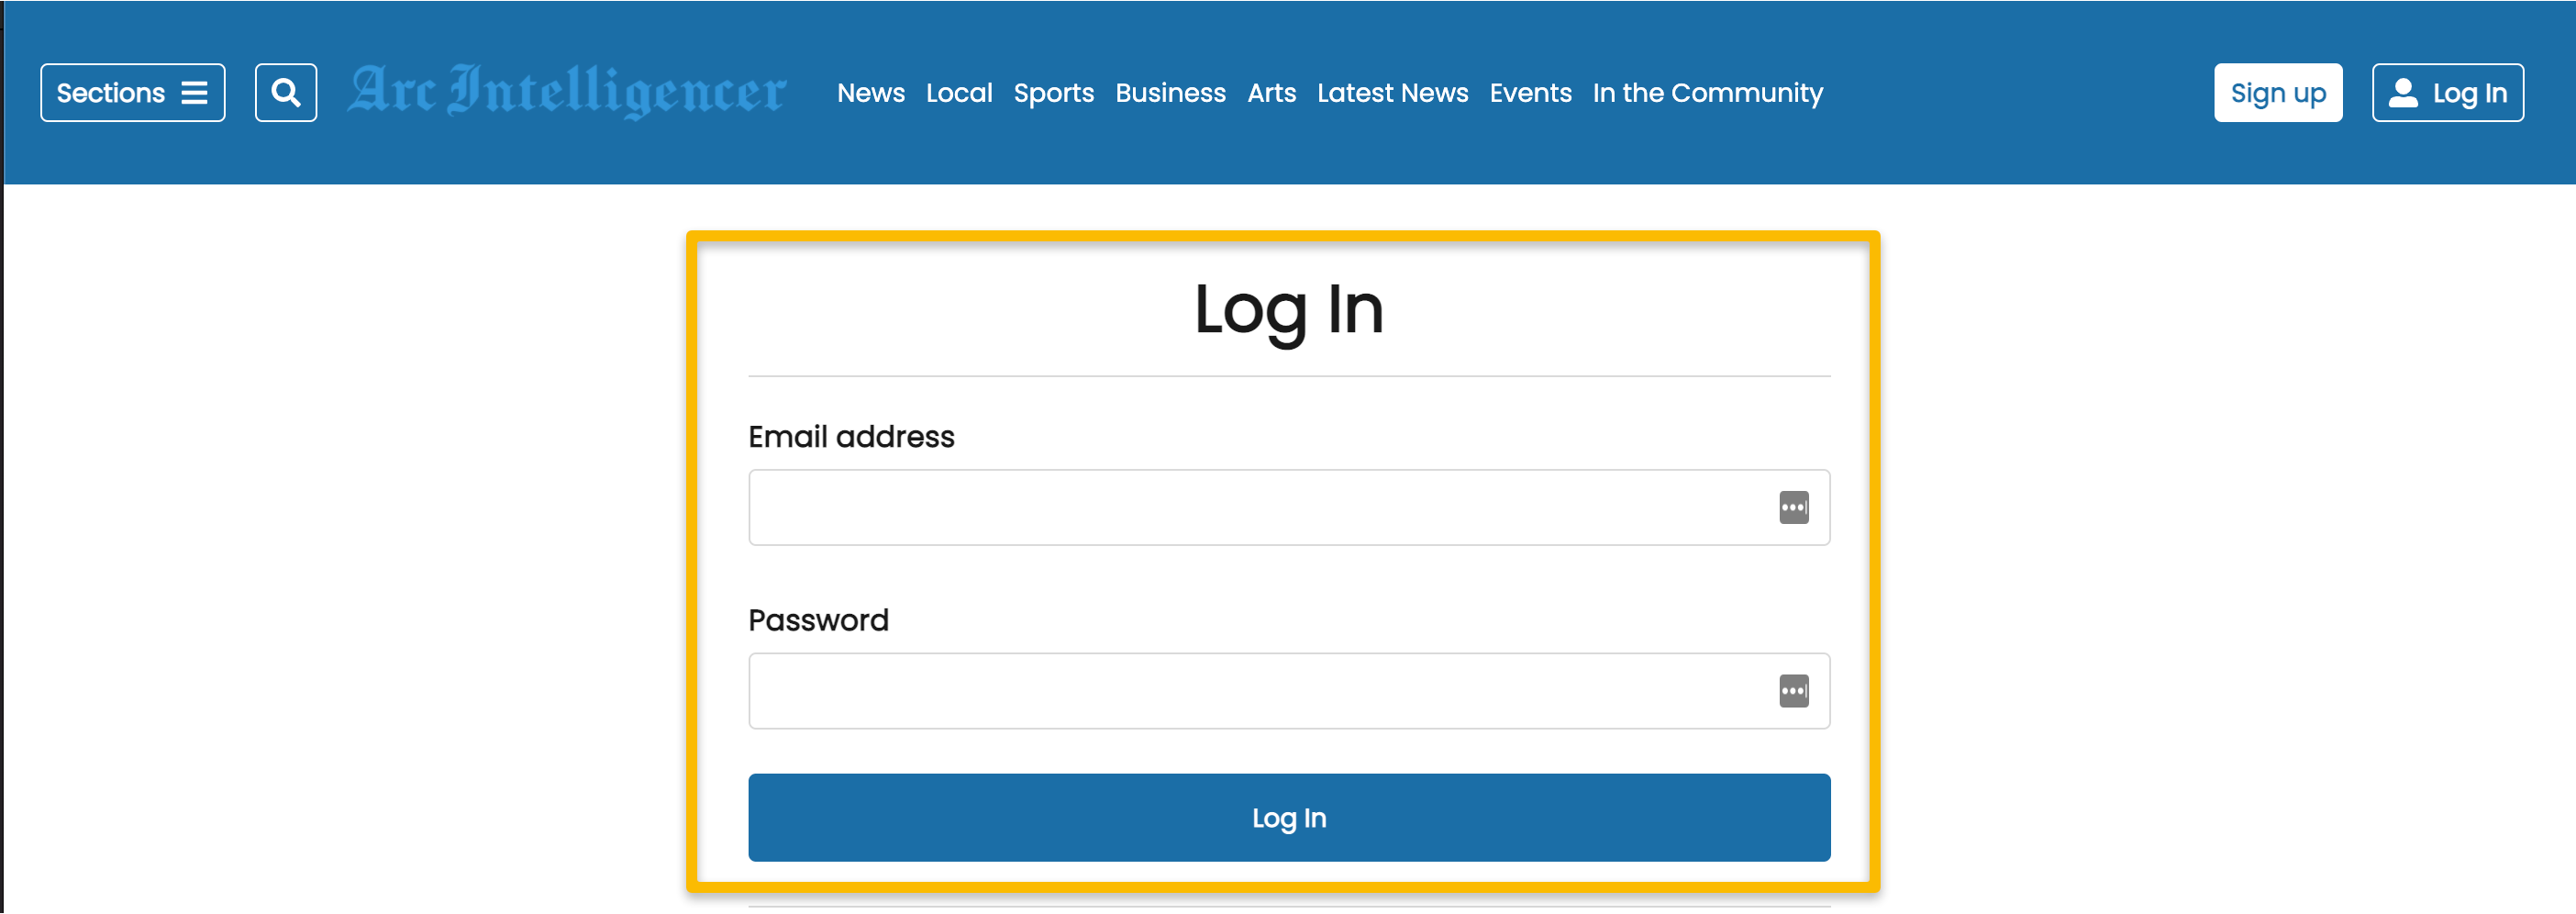
Identity Log In - Arc Block
The Identity Log In block is placed on a page where a user will log in to an existing account.
First, create the Log In page:
In PageBuilder, click Create Page.
Set Page Name as Account - Log In
Set Page URI as /account/login/
In the Setup tab, under Layout, select Single Column - Arc Layout
In the Curate tab, add the Identity Log In - Arc Block to the main section
After publishing the Log In page, a user can log in with an email address and password created on the Sign Up page.
Log In Block Example
 |
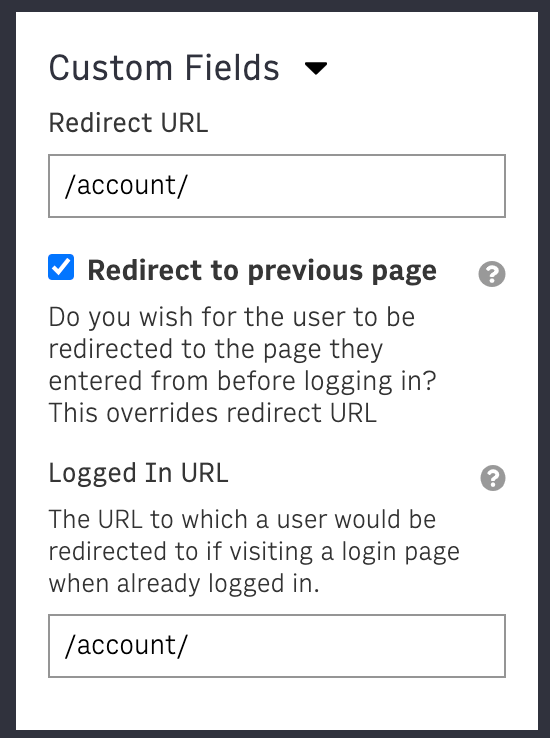
Custom Fields
The Identity Log In block includes the following Custom fields that an admin can configure:
The URL to which a user returns upon successful login (with option to redirect to previous page). Redirect to previous page is not currently supported for SPA-enabled sites.
The URL to which a user is redirected if visiting the Sign In page and the user is already logged in.
 |
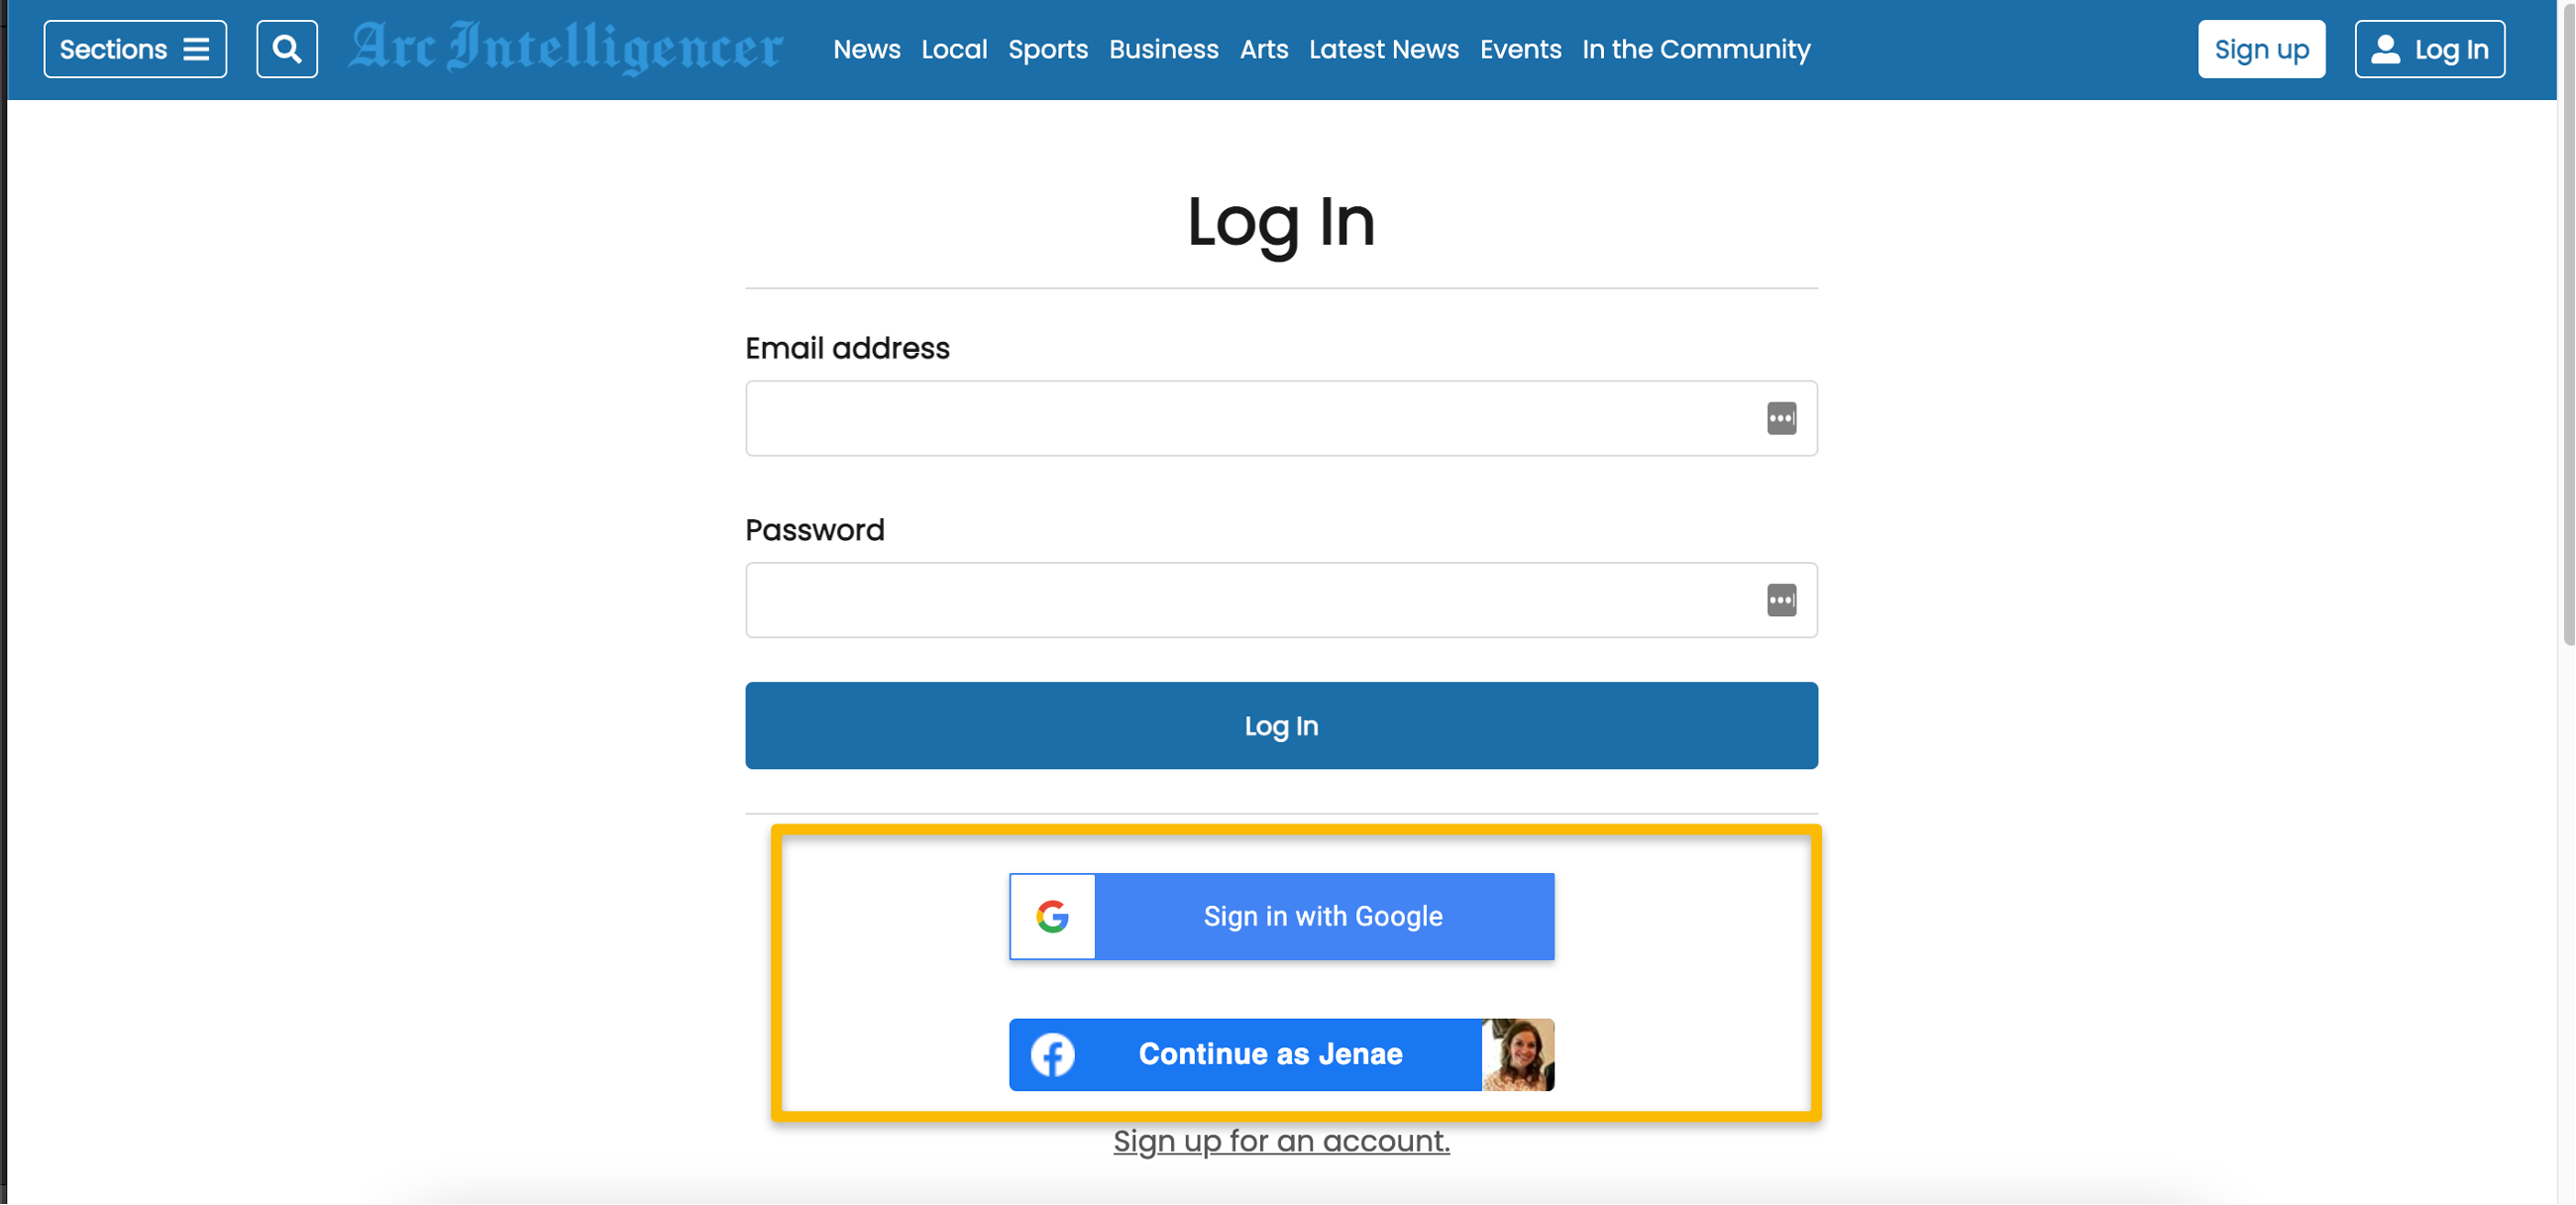
Identity Social Sign On - Arc Block
The Social Sign On block can be placed on both the Log In and Sign Up pages and displays the action buttons to sign in with social accounts, as set up in the Authentication Providers section of the Subscriptions settings application. Currently, Themes supports Facebook, Apple ID, and Google as authentication providers.
The social buttons will dynamically render based on the setup within Arc Subscriptions. For example, if you set up Google in Arc Subscriptions but Facebook is not, only the Google login button shows. The CTA button text will also change based on the user’s logged-in state of the social providers. For example, a user who is not logged into Facebook in their browser session will see “Log In With Facebook,” while a user who is logged into their Facebook account will see “Continue as [Your Name]”.
If a user has an existing account, they will be logged in. If a user is new, an account will be created.
If a user already has an existing e-mail and password account and logs in with a social account of the same e-mail address, the accounts will automatically merge, and a user may log in with either e-mail and password or using the social sign-on buttons.
Example
 |
Custom Fields
The Social Sign On block includes the following Custom fields that an admin can configure:
The URL to which a user returns upon successful login (with option to redirect to previous page). Redirect to previous page is not currently supported for SPA-enabled sites.
The URL to which a user is redirected if visiting the Sign In page and the user is already logged in
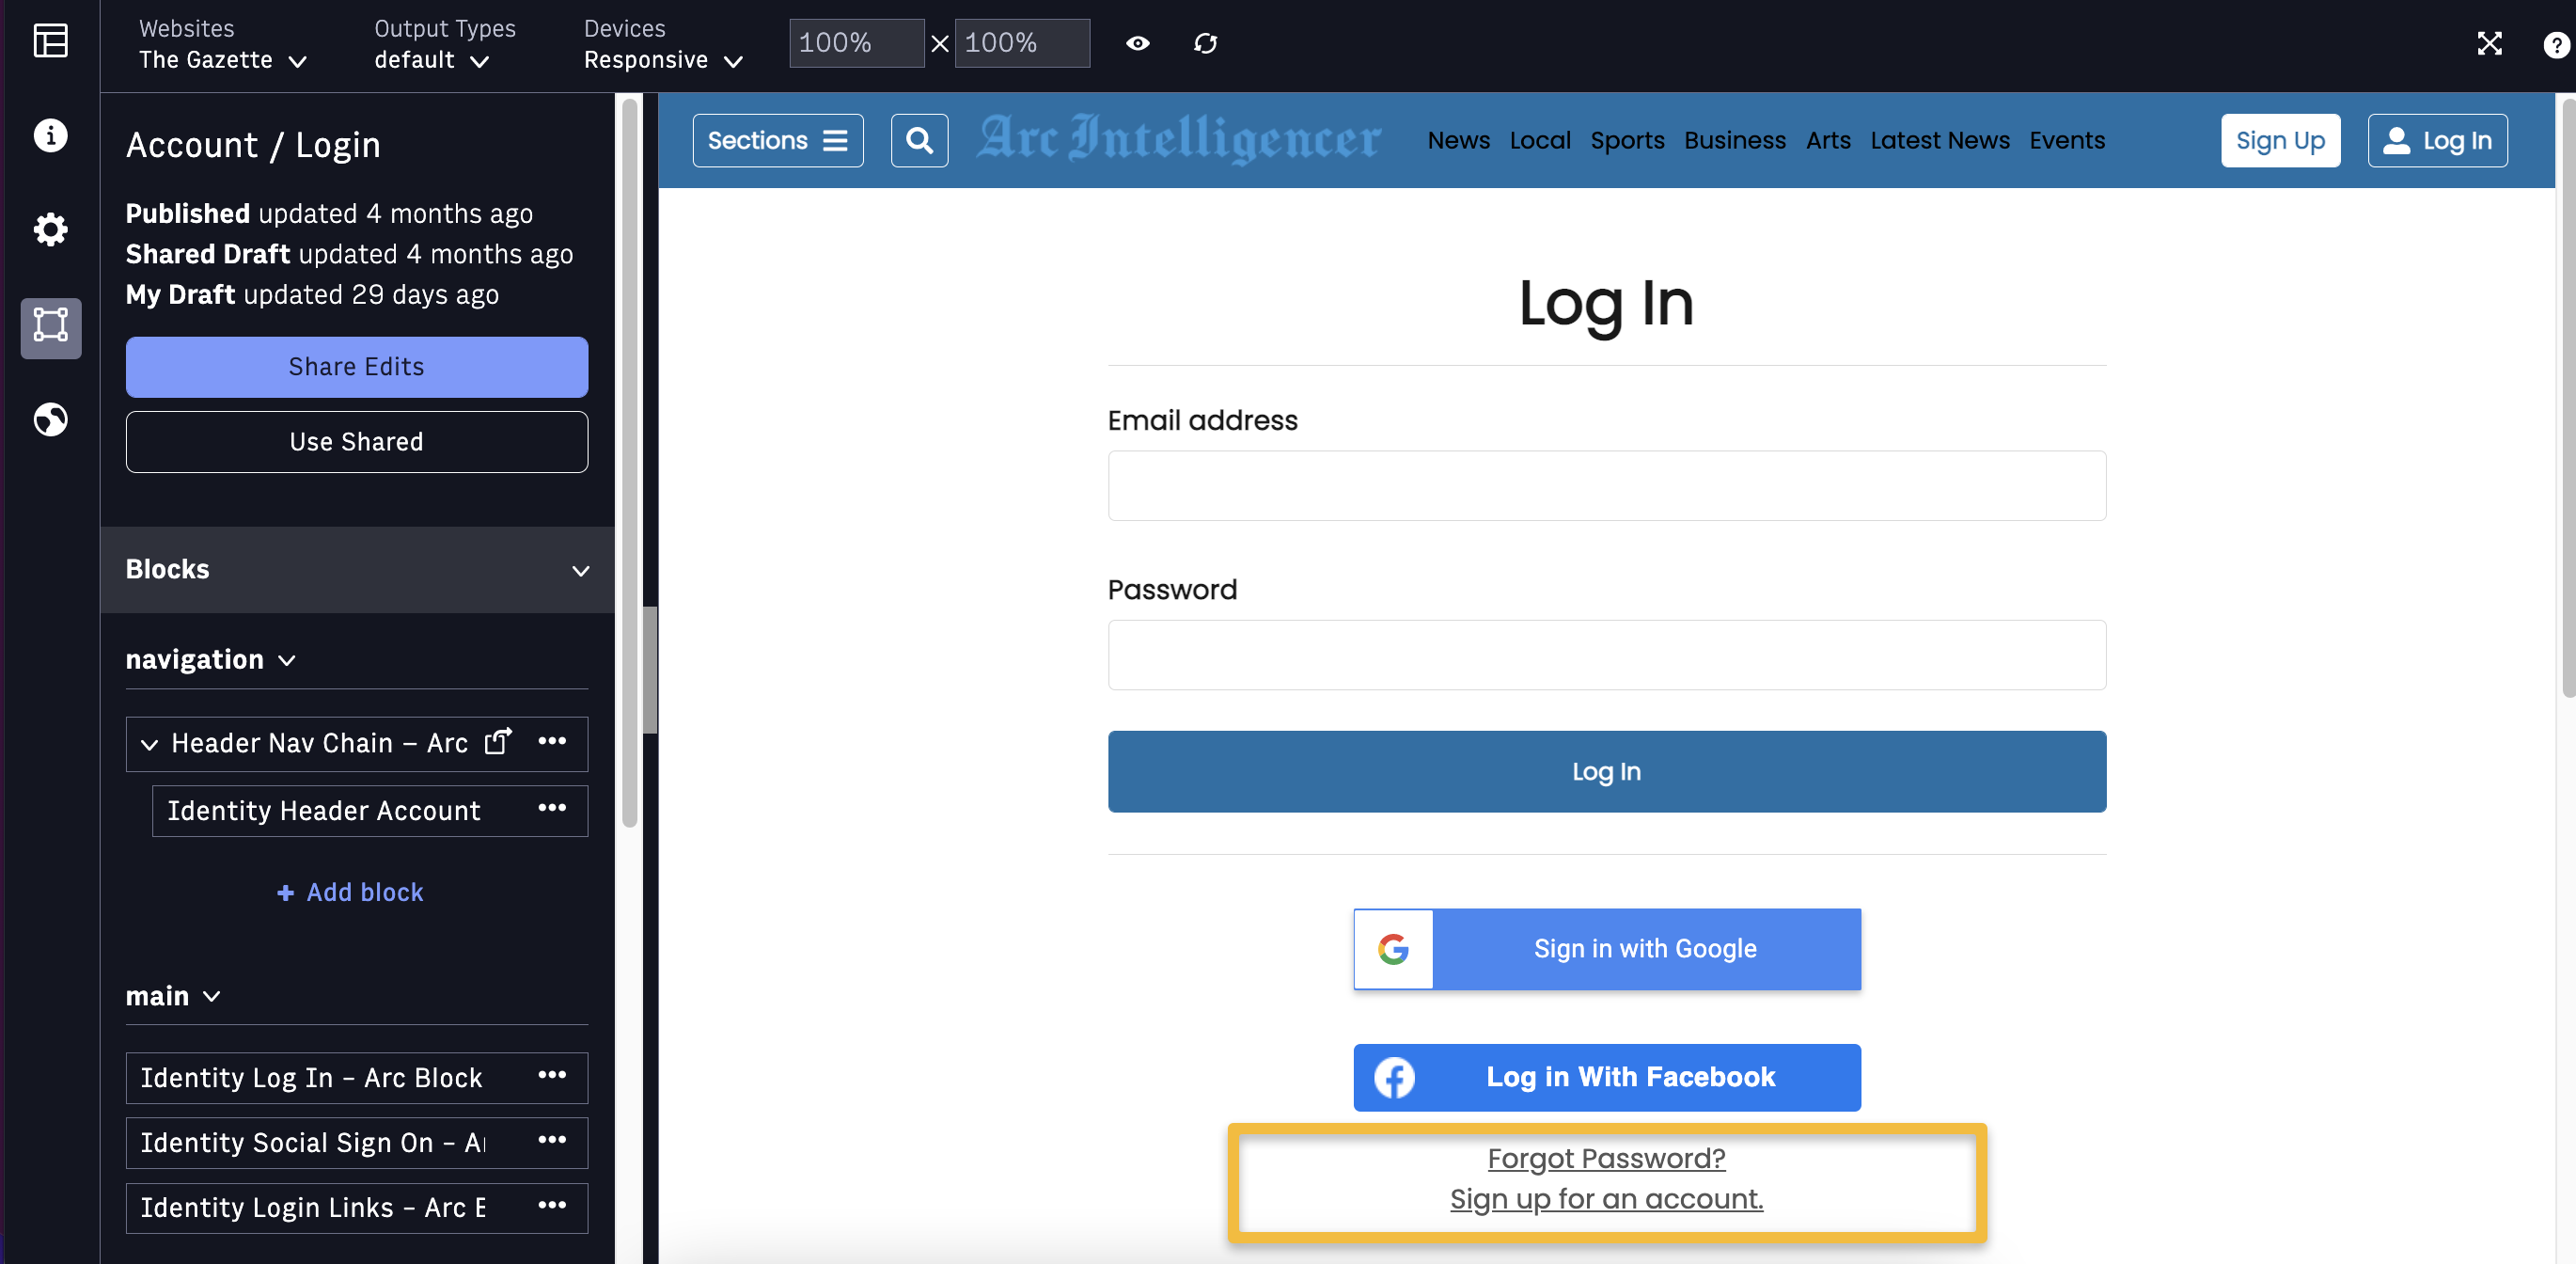
Identity Login Links - Arc Block
The Identity Login Links block is placed on both the Sign Up and Log In pages. It includes links for resetting a password (”Forgot Password?”) and returning to the corresponding Sign Up or Log In page.
For example, if a user arrives at a Sign Up page but they already have an account, the Login Links block can be configured to take them to the Log In page.
To use the Login Links block on the Sign Up page, you will:
Add the Login Links block (typically below the Sign Up block) on the Sign Up page
Enable the “Show Login Link” in the login section of the Custom Fields
Enter the URL where a user should Log In (/account/login/ by default)
If a user arrives at a Log In page but has not yet created an account, the Login Links block can be configured to take them to the Sign Up page.
To use the Login Links block on the Sign Up page, you will:
Add the Login Links block (typically below the Log In block) on the Log In page
Enable the “Show Sign Up Link” in the login section of the Custom Fields
Enter the URL where a user should Sign Up (/account/signup/ by default)
You can also use the Log In Links block to add a “Forgot Password?” link to the Log In page.
Add the Login Links block (typically below the Log In block) on the Log In page
Enable the “Show Forgot Password Link” in the login section of the Custom Fields
Enter the URL where a user should request a password reset (/account/forgot-password/ by default)
Example
 |
Custom Fields
The Log In Links block includes the following Custom fields that an admin can configure:
Show Log In Link checkbox - Used on the Sign Up page to direct users who have an existing account and need to log in
Log In Link URL - The URL where a user can log in
Show Forgot Password checkbox - Used on the Log In Page to direct users to a forgot password page where they can initiate a password reset
Forgot Password URL - The URL where a user can request a password reset
Show Sign Up Link checkbox - Used on the Log In page to direct users who need to create an account
Sign Up Link URL - The URL where a user can sign up for an account
Creating a “Forgot Password?” Experience
If a user cannot remember their password, they can request a password reset by clicking the “Forgot Password?” link from the Login Links block. We recommend creating a “Forgot Password?” page where a user enters their e-mail to request a password reset and a “Reset Password” page where a user returns to set a new password after receiving the password reset e-mail.
The Forgot Password flow is:
From the Login page, your customer clicks “Forgot Password” and is directed to the Forgot Password page, which includes the Forgot Password block.
Your customer enters their e-mail address on the Forgot Password page to generate a password reset.
Our system generates a WebSocket
PASSWORD_RESET_REQUESTevent. You can listen for this event and dispatch an email that provides the user with a link that contains the provided reset nonce. See Listening For A Password Reset Request.Your customer receives an email with a link to reset the password. The link directs to the Reset Password page that includes the Reset Password block and a nonce parameter in the URL. For example, a Reset Password link may be constructed like:
https://www.yoursite.com/reset-password?nonce=TA8QQ4D22I9Px7dmtahj73YObKDk-ZxaTGTvxaBXCGUa2GidYour customer enters a new password on the Reset Password page. The customer can now log in with the new password.
Identity - Forgot Password - Arc Block
The Identity Forgot Password block is placed on a Forgot Password page, where a user can initiate a password reset. Users typically arrive at the Forgot Password page from the Log In page.
To use the Forgot Password block, first create the Forgot Password page:
In PageBuilder, click Create Page.
Set Page Name as Account - Forgot Password
Set Page URI as /account/forgot-password/
In the Setup tab, under Layout, select Single Column - Arc Layout
In the Curate tab, add the Identity Forgot Password - Arc Block to the main section
After publishing the Forgot Password page, a user will be able to initiate a password reset by entering an email address.
Note
Themes does not create or send emails. You will need to set up the reset password emails with your email provider.
Examples
The ‘Forgot Password’ flow begins with a user entering their e-mail address on the Forgot Password block:
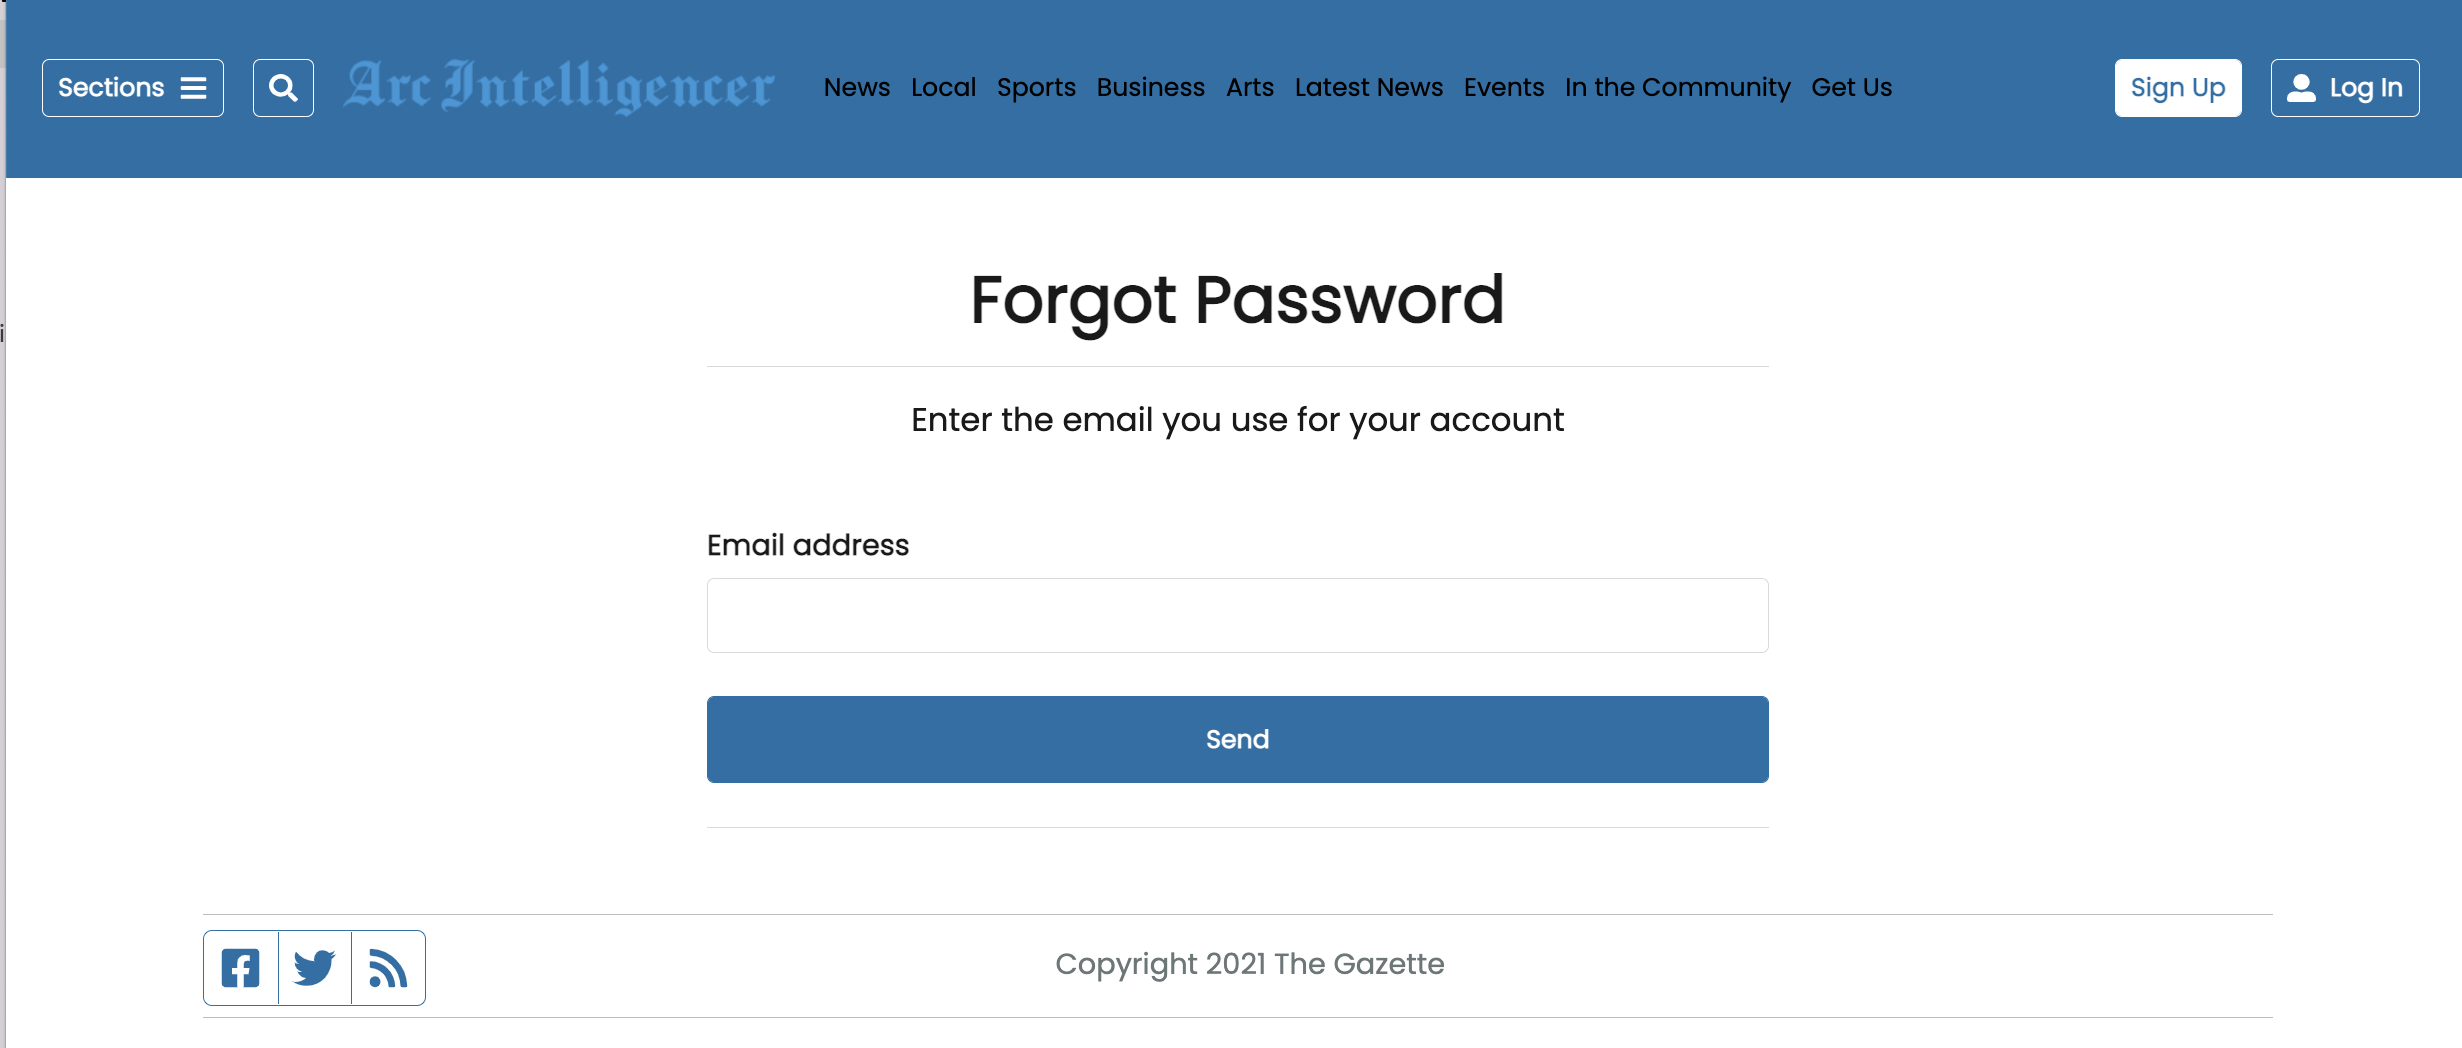 |
Upon entering an email address, the Forgot Password block shows a message to check the customer's email:
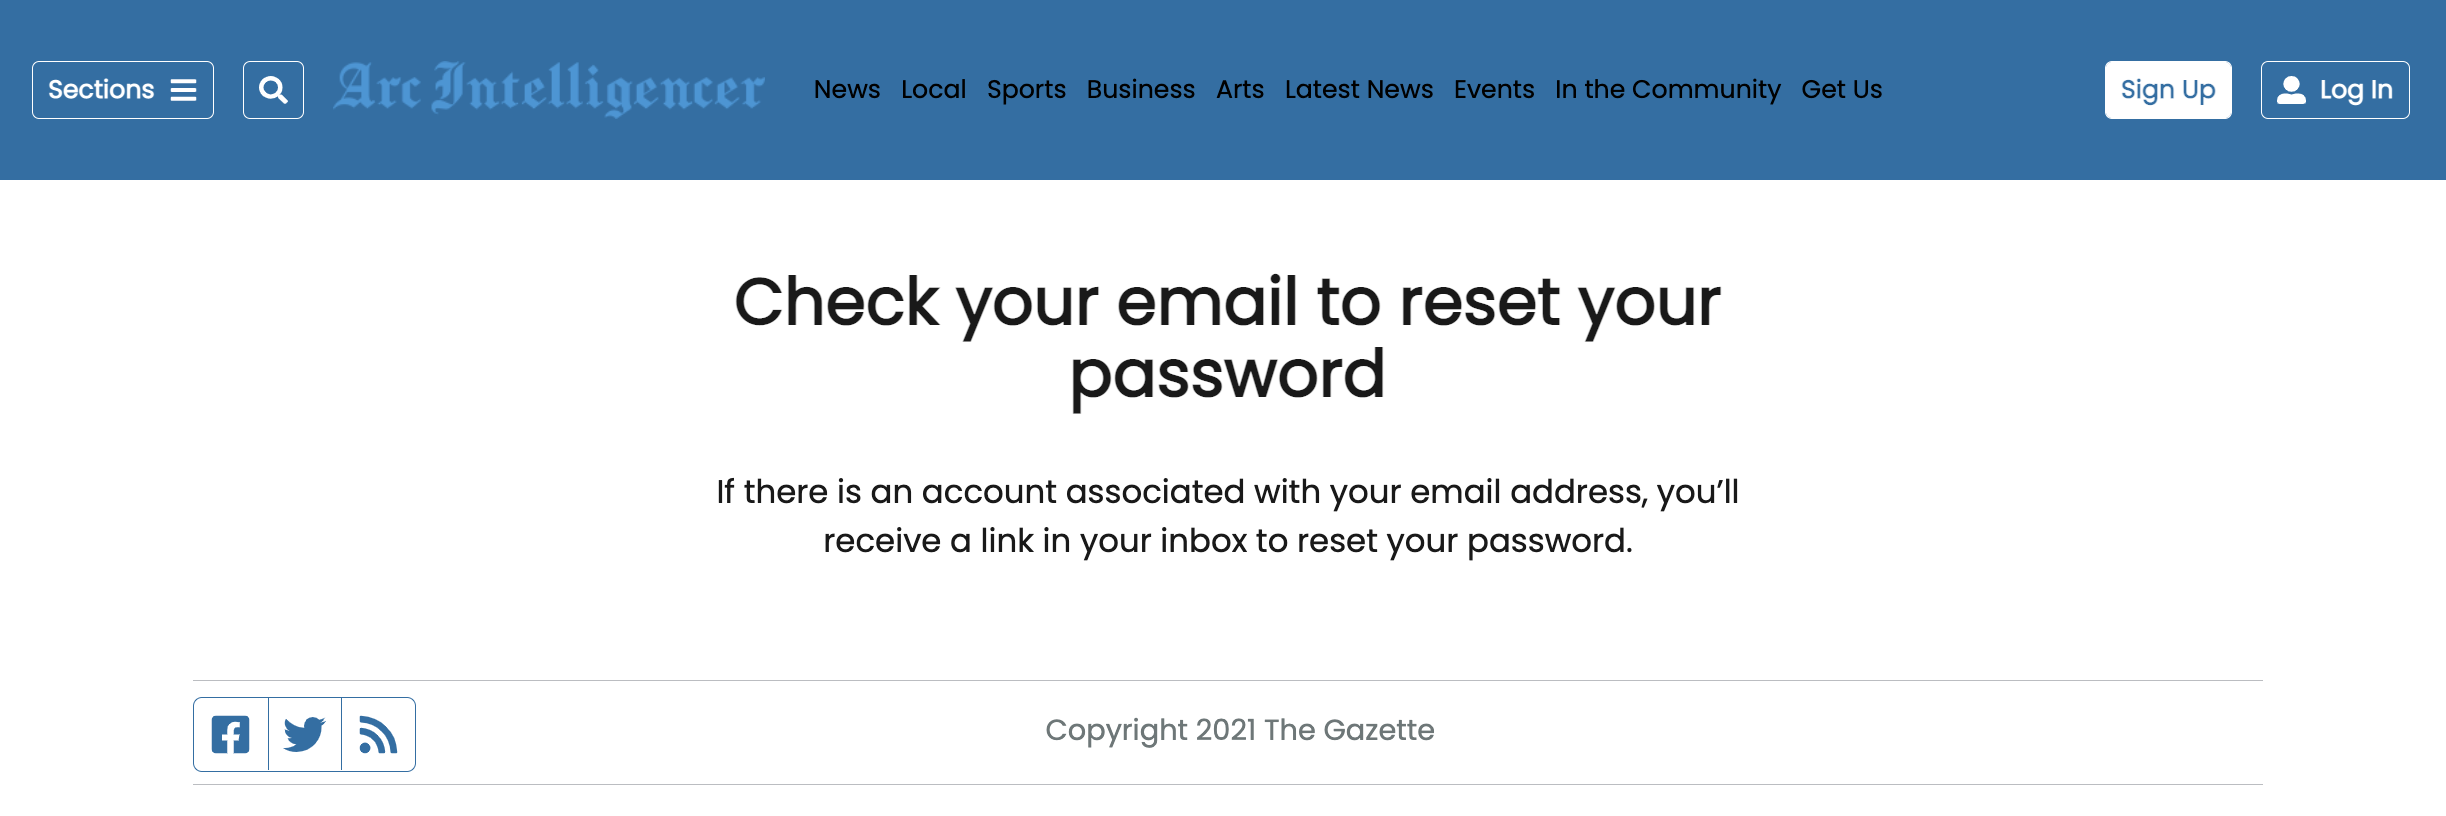 |
Upon clicking the reset password link in their email, customers are directed to a page with the Reset Password block.
Identity - Reset Password - Arc Block
The Identity Reset Password block is placed on a Reset Password page, where a user can create a new password. Users arrive at a Reset Password page by clicking a link in the reset password e-mail.
To use the Reset Password block, first create the Reset Password page:
In PageBuilder, click Create Page.
Set Page Name as Account - Reset Password
Set Page URI as /account/reset-password/
In the Setup tab, under Layout, select Single Column - Arc Layout
In the Curate tab, add the Identity Reset Password - Arc Block to the main section
After publishing the Reset Password page, a user will be able to reset their password by entering a new password twice.
Note
Themes does not create or send emails. You must set up the reset password emails with your email provider.
Custom Fields
The Identity Reset Password block includes the following Custom fields that an admin can configure:
Successful Action URL - Where the user is directed to after successfully resetting the password. Set to /account/login/ by default.
Examples
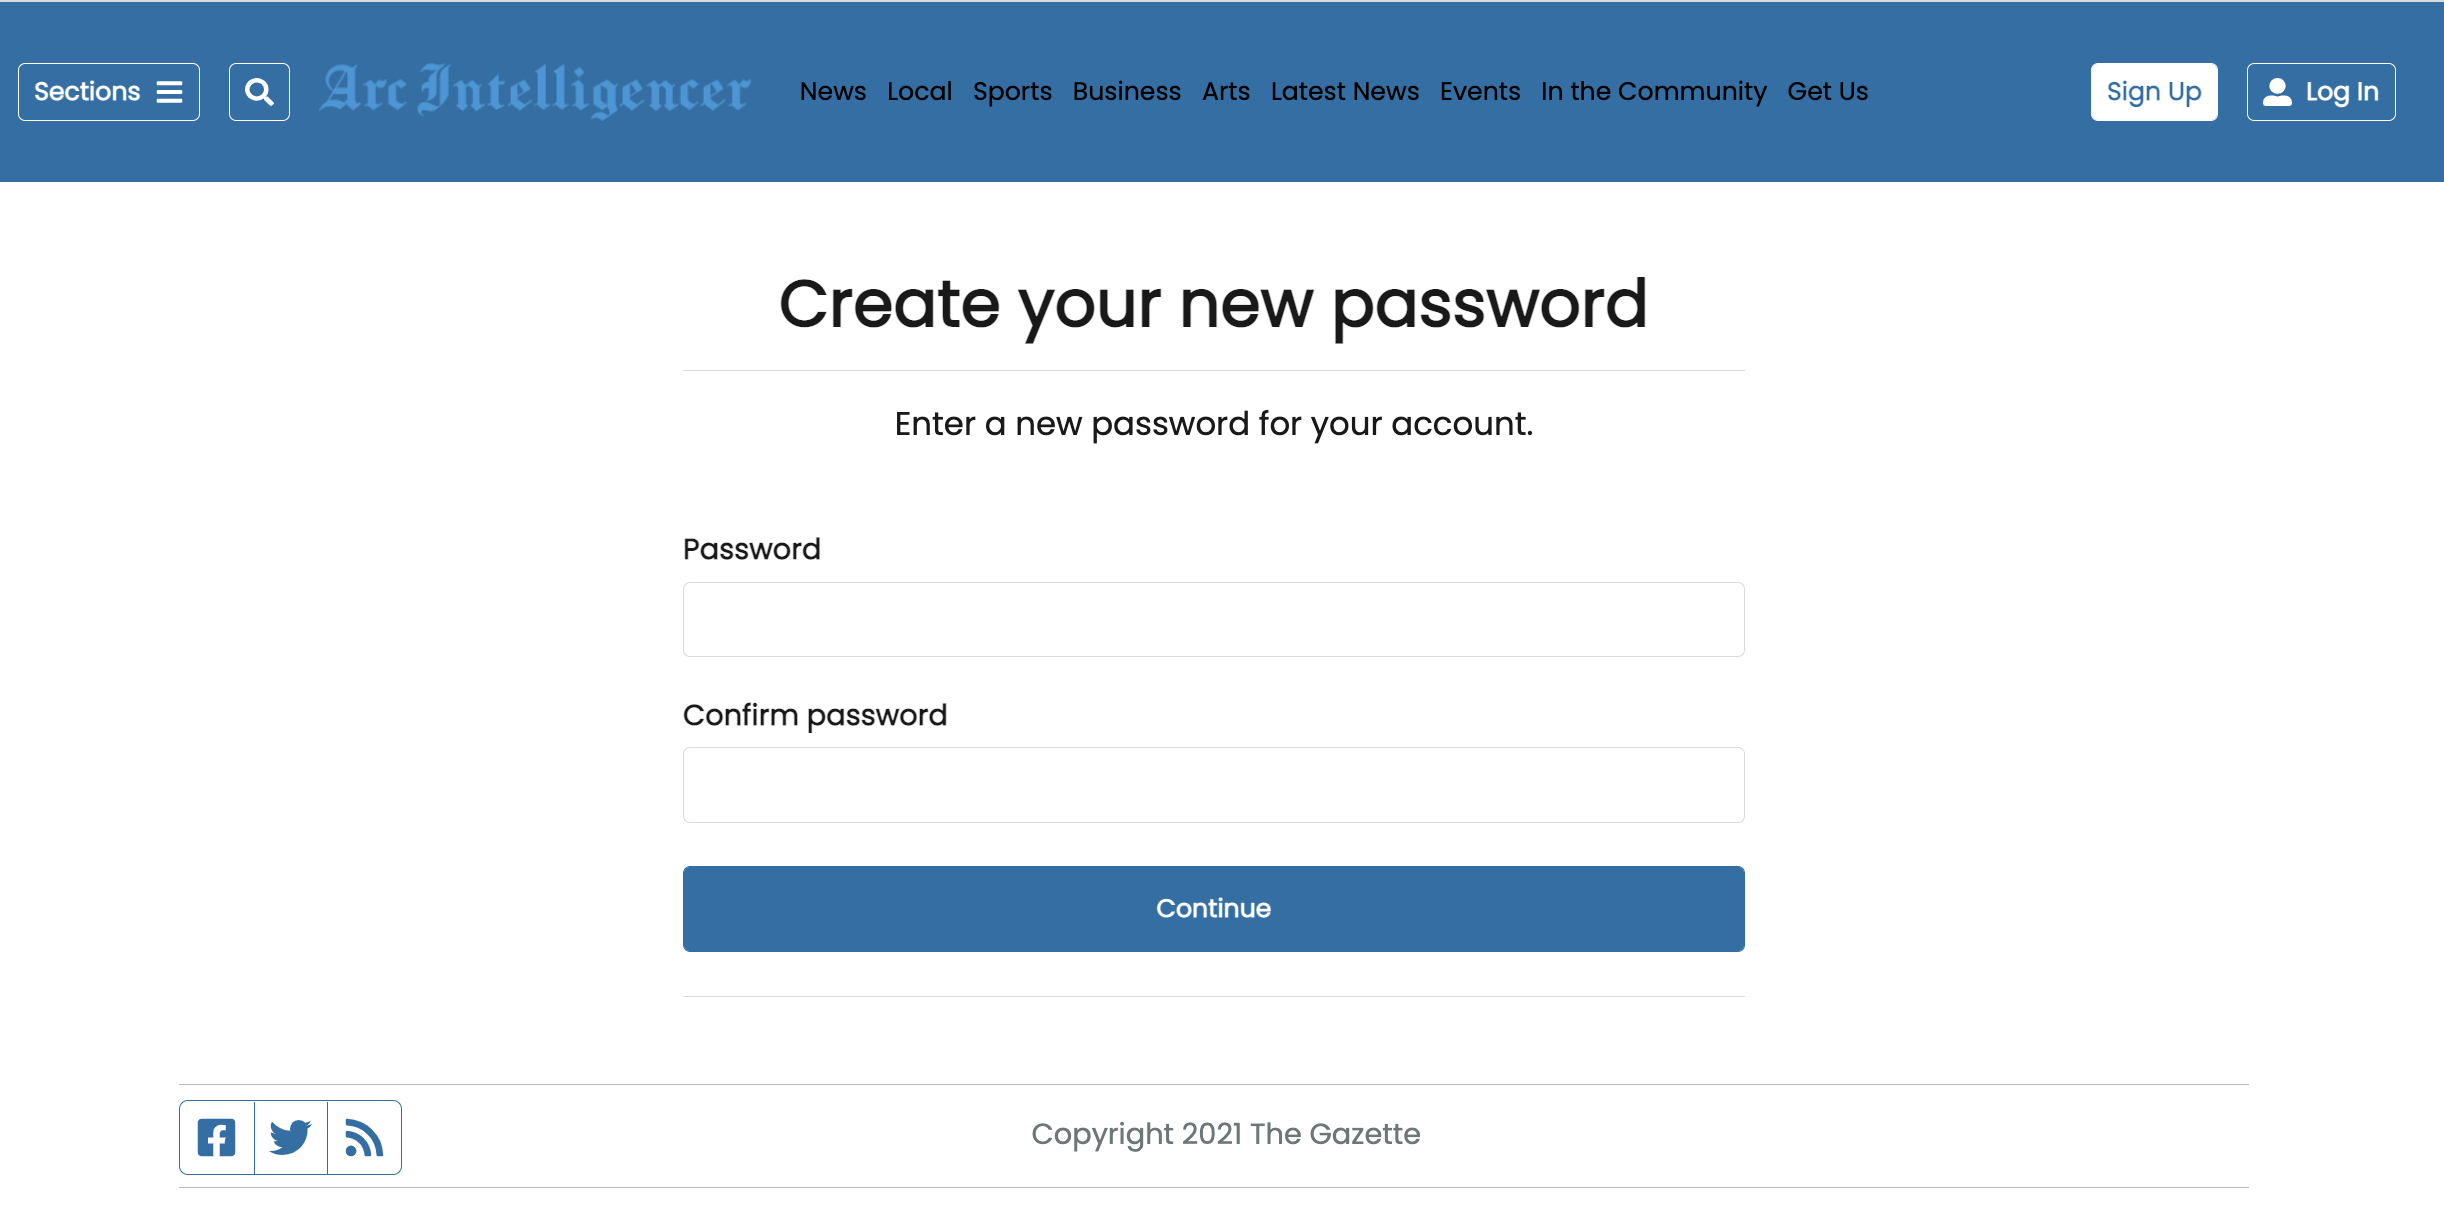 |
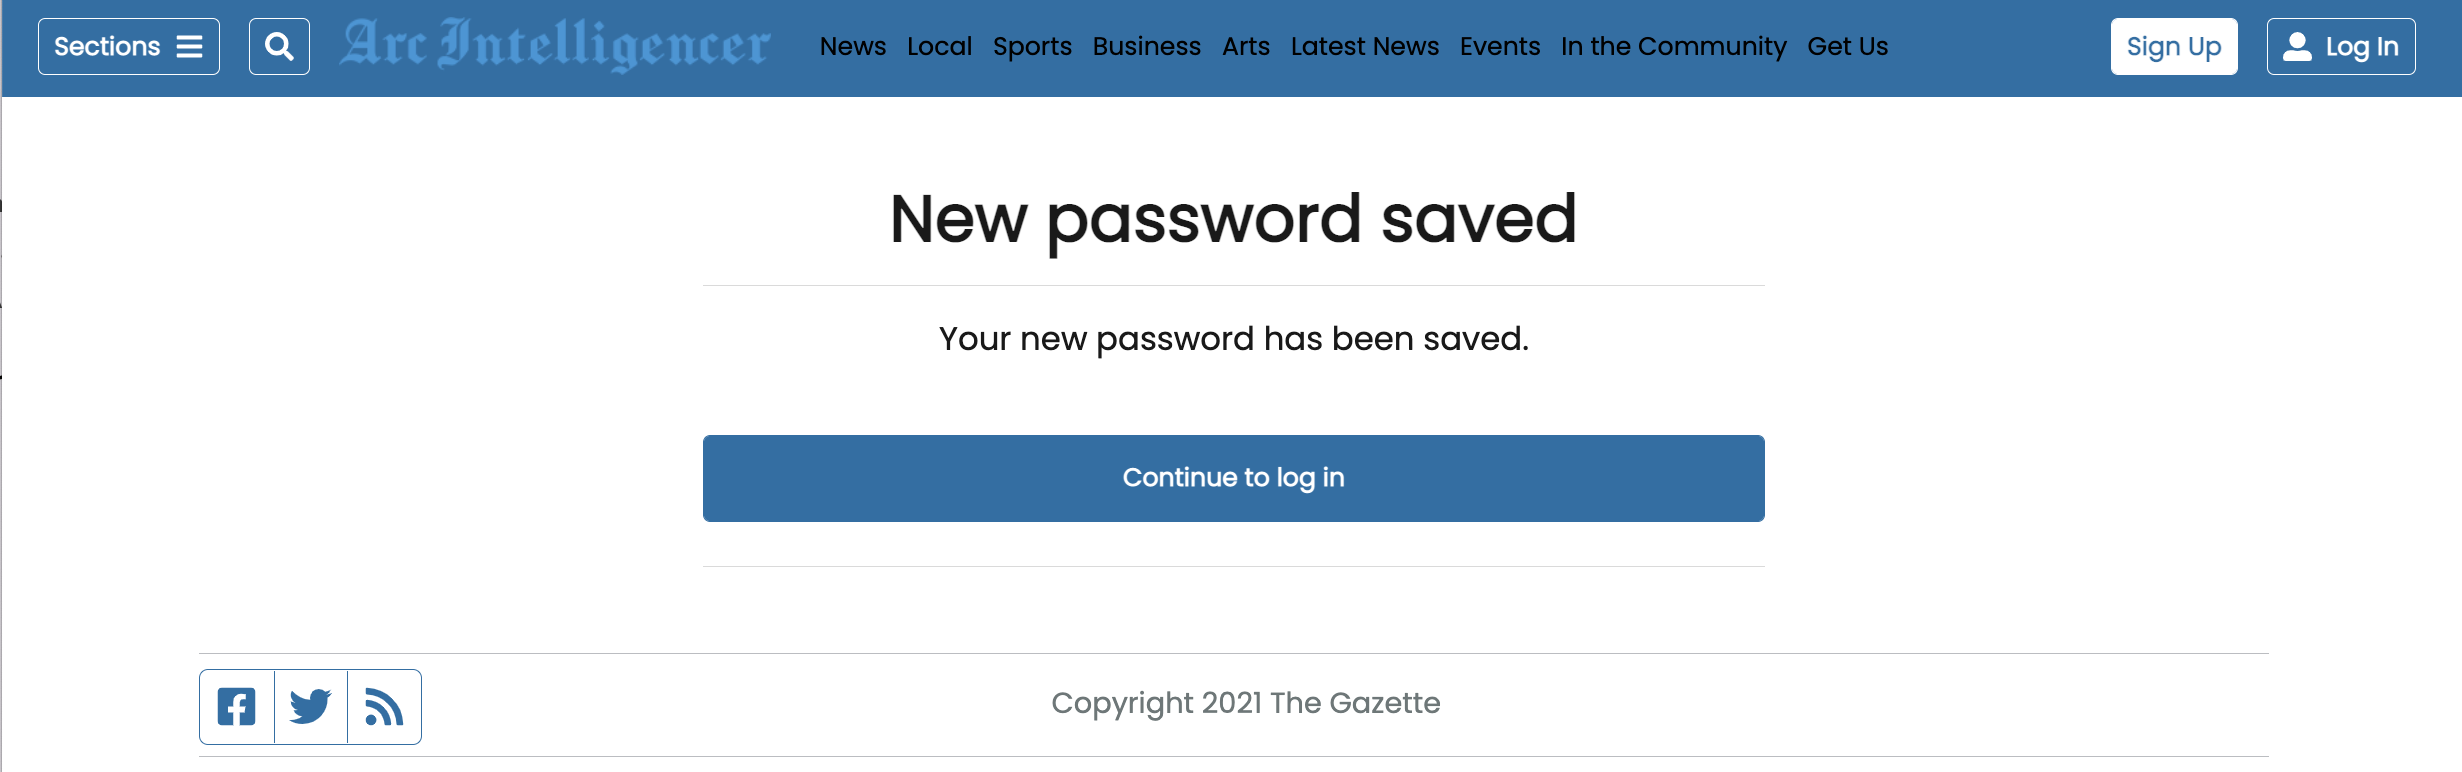 |
Adding Sign Up and Log In buttons to the Navigation Chain
Using the Identity Header Account Arc Block, you can easily add dynamic Sign Up and Log In buttons to your navigation chain. These buttons will show to all logged-out users. Once a user logs in, the buttons dynamically change to a single “My Account” button with a dropdown menu that includes Manage Your Account and Log Out links.
Identity Header Account - Arc Block
You can easily update your existing navigation chain to include the Identity Header Account block on the Fragments page.
Example
The Identity Header Account block adds the Sign Up and Log In links to the navigation.
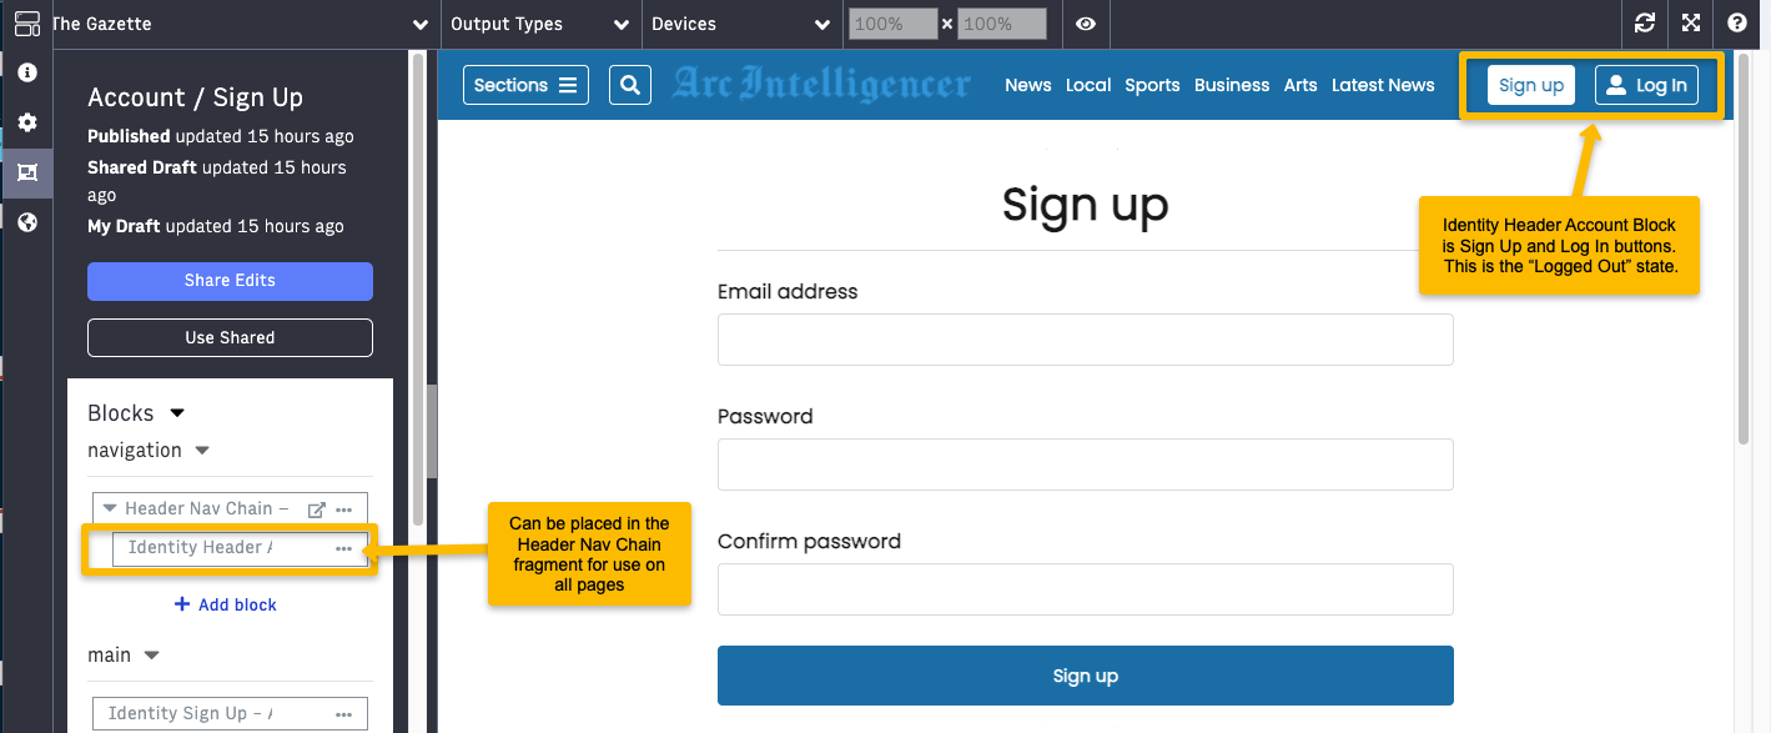 |
The Identity Header Account buttons will change based on whether the user is logged in or not, and collapse to a single button with a drop-down on mobile breakpoints. For example,
Desktop Logged In state:
 |
Mobile Logged Out state:
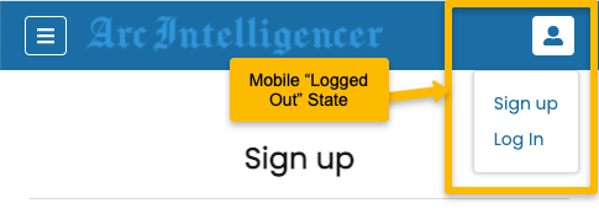 |
Mobile Logged In state:
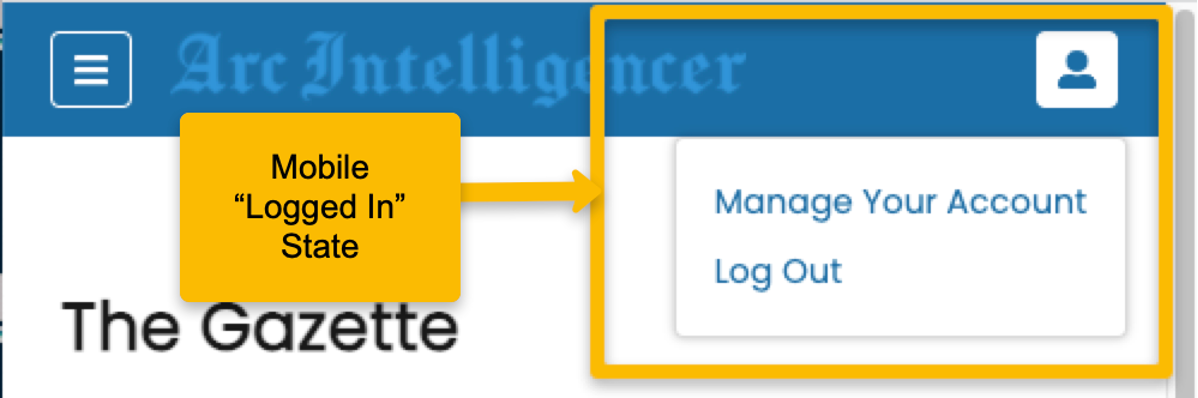 |
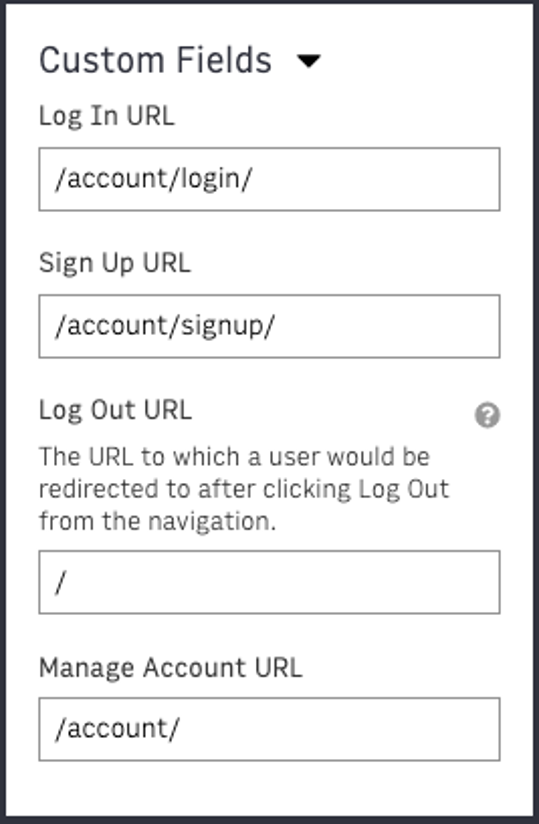
Custom Fields
The Identity Header Account block includes the following Custom fields that an admin can configure:
Log In URL - Where the Log In button of the Navigation directs a user. Set to /account/login/ by default.
Sign Up URL - Where the Sign Up button of the Navigation directs a user. Set to /account/signup/ by default
Log Out URL - Where a user is directed upon clicking “Log Out” from the Navigation. Set to/by default (returns to homepage)
Manage Account URL - Where the “My Account” link from the signed-in dropdown of the Navigation directs a user. Set to /account/ by default.
 |
Security and reCAPTCHA Protections
Identity - Sign Up - Arc Block, Identity Sign In - Arc Block, Identity Social Sign On - Arc Block
reCAPTCHA protections can be enabled in the Identity blocks to protect your site from attacks. You must configure and enable reCAPTCHA in the Subscriptions Settings admin. After the options for User registration and User sign-in are enabled, the reCAPTCHA protections are automatically included on those screens. For more details on configuring reCAPTCHA, see Secure your site against attacks: CORS domains, blocked email domains, and reCAPTCHA.
Creating an Account Management Profile Page
An Account Management Profile Page can be accessed from the navigation dropdown of the Identity Account Header Arc Block. This page allows a user to see or edit their current profile information.
Account Management - Profile - Arc Block
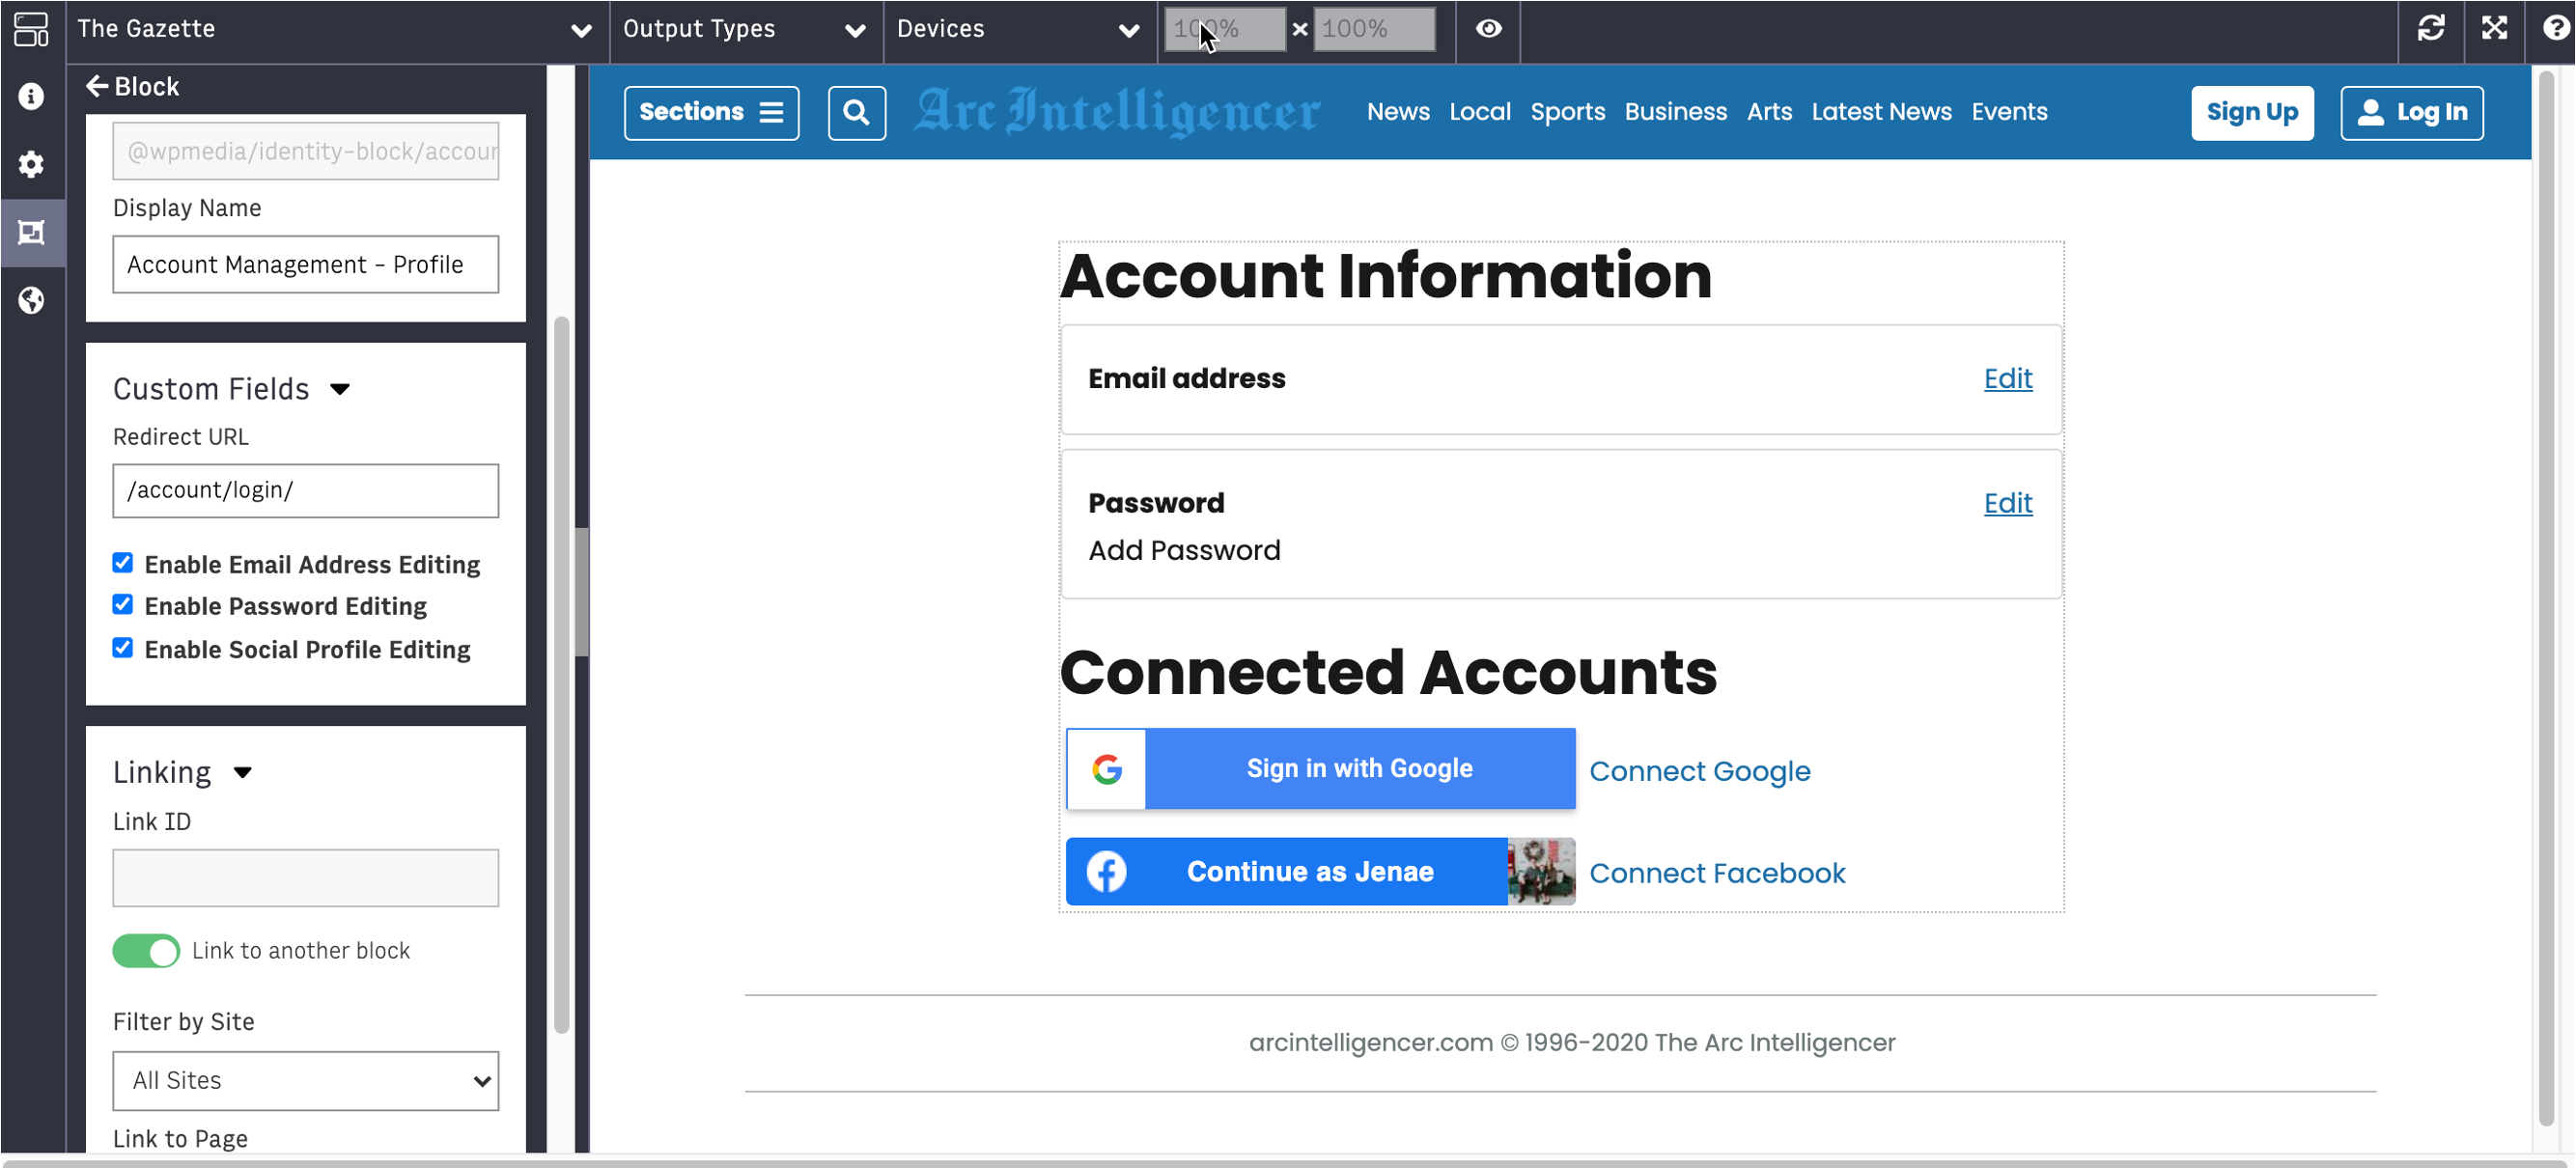
The Account Management—Profile block is placed on a Profile page, where customers can see their current account information. It is used to self-manage a user’s account, including updating the user’s email address and password and connecting or disconnecting social accounts.
To use the Profile block, first create the Account Management - Profile page:
In PageBuilder, click Create Page.
Set Page Name as Account - Profile
Set Page URI as /account/profile/
In the Setup tab, under Layout, select Single Column - Arc Layout
In the Curate tab, add the Account Management - Profile block to the main section
Example
 |
Custom Fields
Redirect URL - The page where a user is redirected if arriving at a Profile page when not logged in. Recommended URL: /account/login/
Enable Email Address Editing checkbox - Displays the functionality for updating a user’s email address; you may disable this if you are using social logins only
Enable Password Editing checkbox - Displays the functionality for updating a user’s password; you may disable this if you are using social logins only
Enable Social Profile Editing checkbox - Displays the functionality for connecting or disconnecting social authentication providers from a user’s account
Subscriptions Block Overview
The Subscriptions block package consists of 3 Arc Blocks that can be used to configure the purchase experience for accessing walled content. It is used to manage the end-user aspects of displaying a paywall, showing a variety of subscription offers, and checking out. It is easy to create the following experiences using the corresponding block included in the Subscriptions block package:
Experience/Functionality | Arc Block(s) in PageBuilder |
|---|---|
Paywall or Registration Wall overlay that a user runs into after consuming the budget, as defined in Arc Subscriptions | Paywall - Arc Block |
Offer page where a user can select from a variety of options, or a specified campaign | Offer - Arc Block |
Checkout page where a user can purchase a chosen offer | Checkout - Arc Block |
Creating a Paywall Experience
A paywall experience is easy to set up using the Paywall Arc Block. The Paywall block can be placed on any template where you want a registration wall or paywall to appear (typically an article template) and renders for a user based on the paywall rules set up in the Subscriptions application.
The Subscriptions - Paywall block controls both the Registration wall and Paywall bottom drawer overlays at the same time, so it can handle any combination of rules you’d like. For example, you may want a user to have 3 free articles before they need to register as a user, then 5 more articles before they need to subscribe. This can be achieved by setting up your rules in Arc Subscriptions, then configuring your Registration Wall and Paywall using the Paywall Arc Block in PageBuilder.
Subscriptions - Paywall - Arc Block
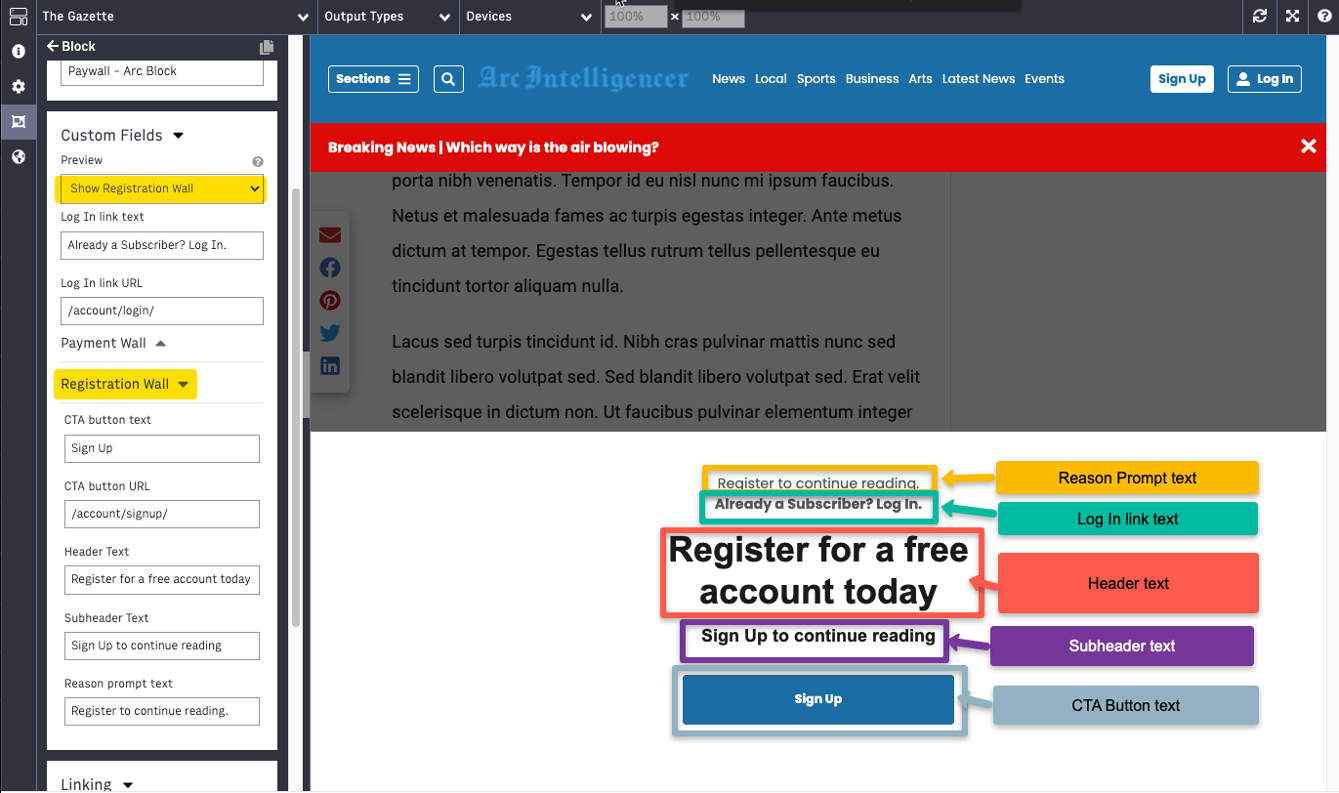
When using the Paywall block as a Registration Wall, you will enter the copy directly in PageBuilder as custom fields on the block. These fields include a Reason Prompt text (for instance, “Register to continue reading.”), Log in Link text that takes a user who may already have an account to a Log In page (for instance, “Already a subscriber? Log in.”), Header (for instance, Register for a free account today), Subheader (for instance, Sign up to continue reading), and a Sign Up button.
Registration Wall
 |
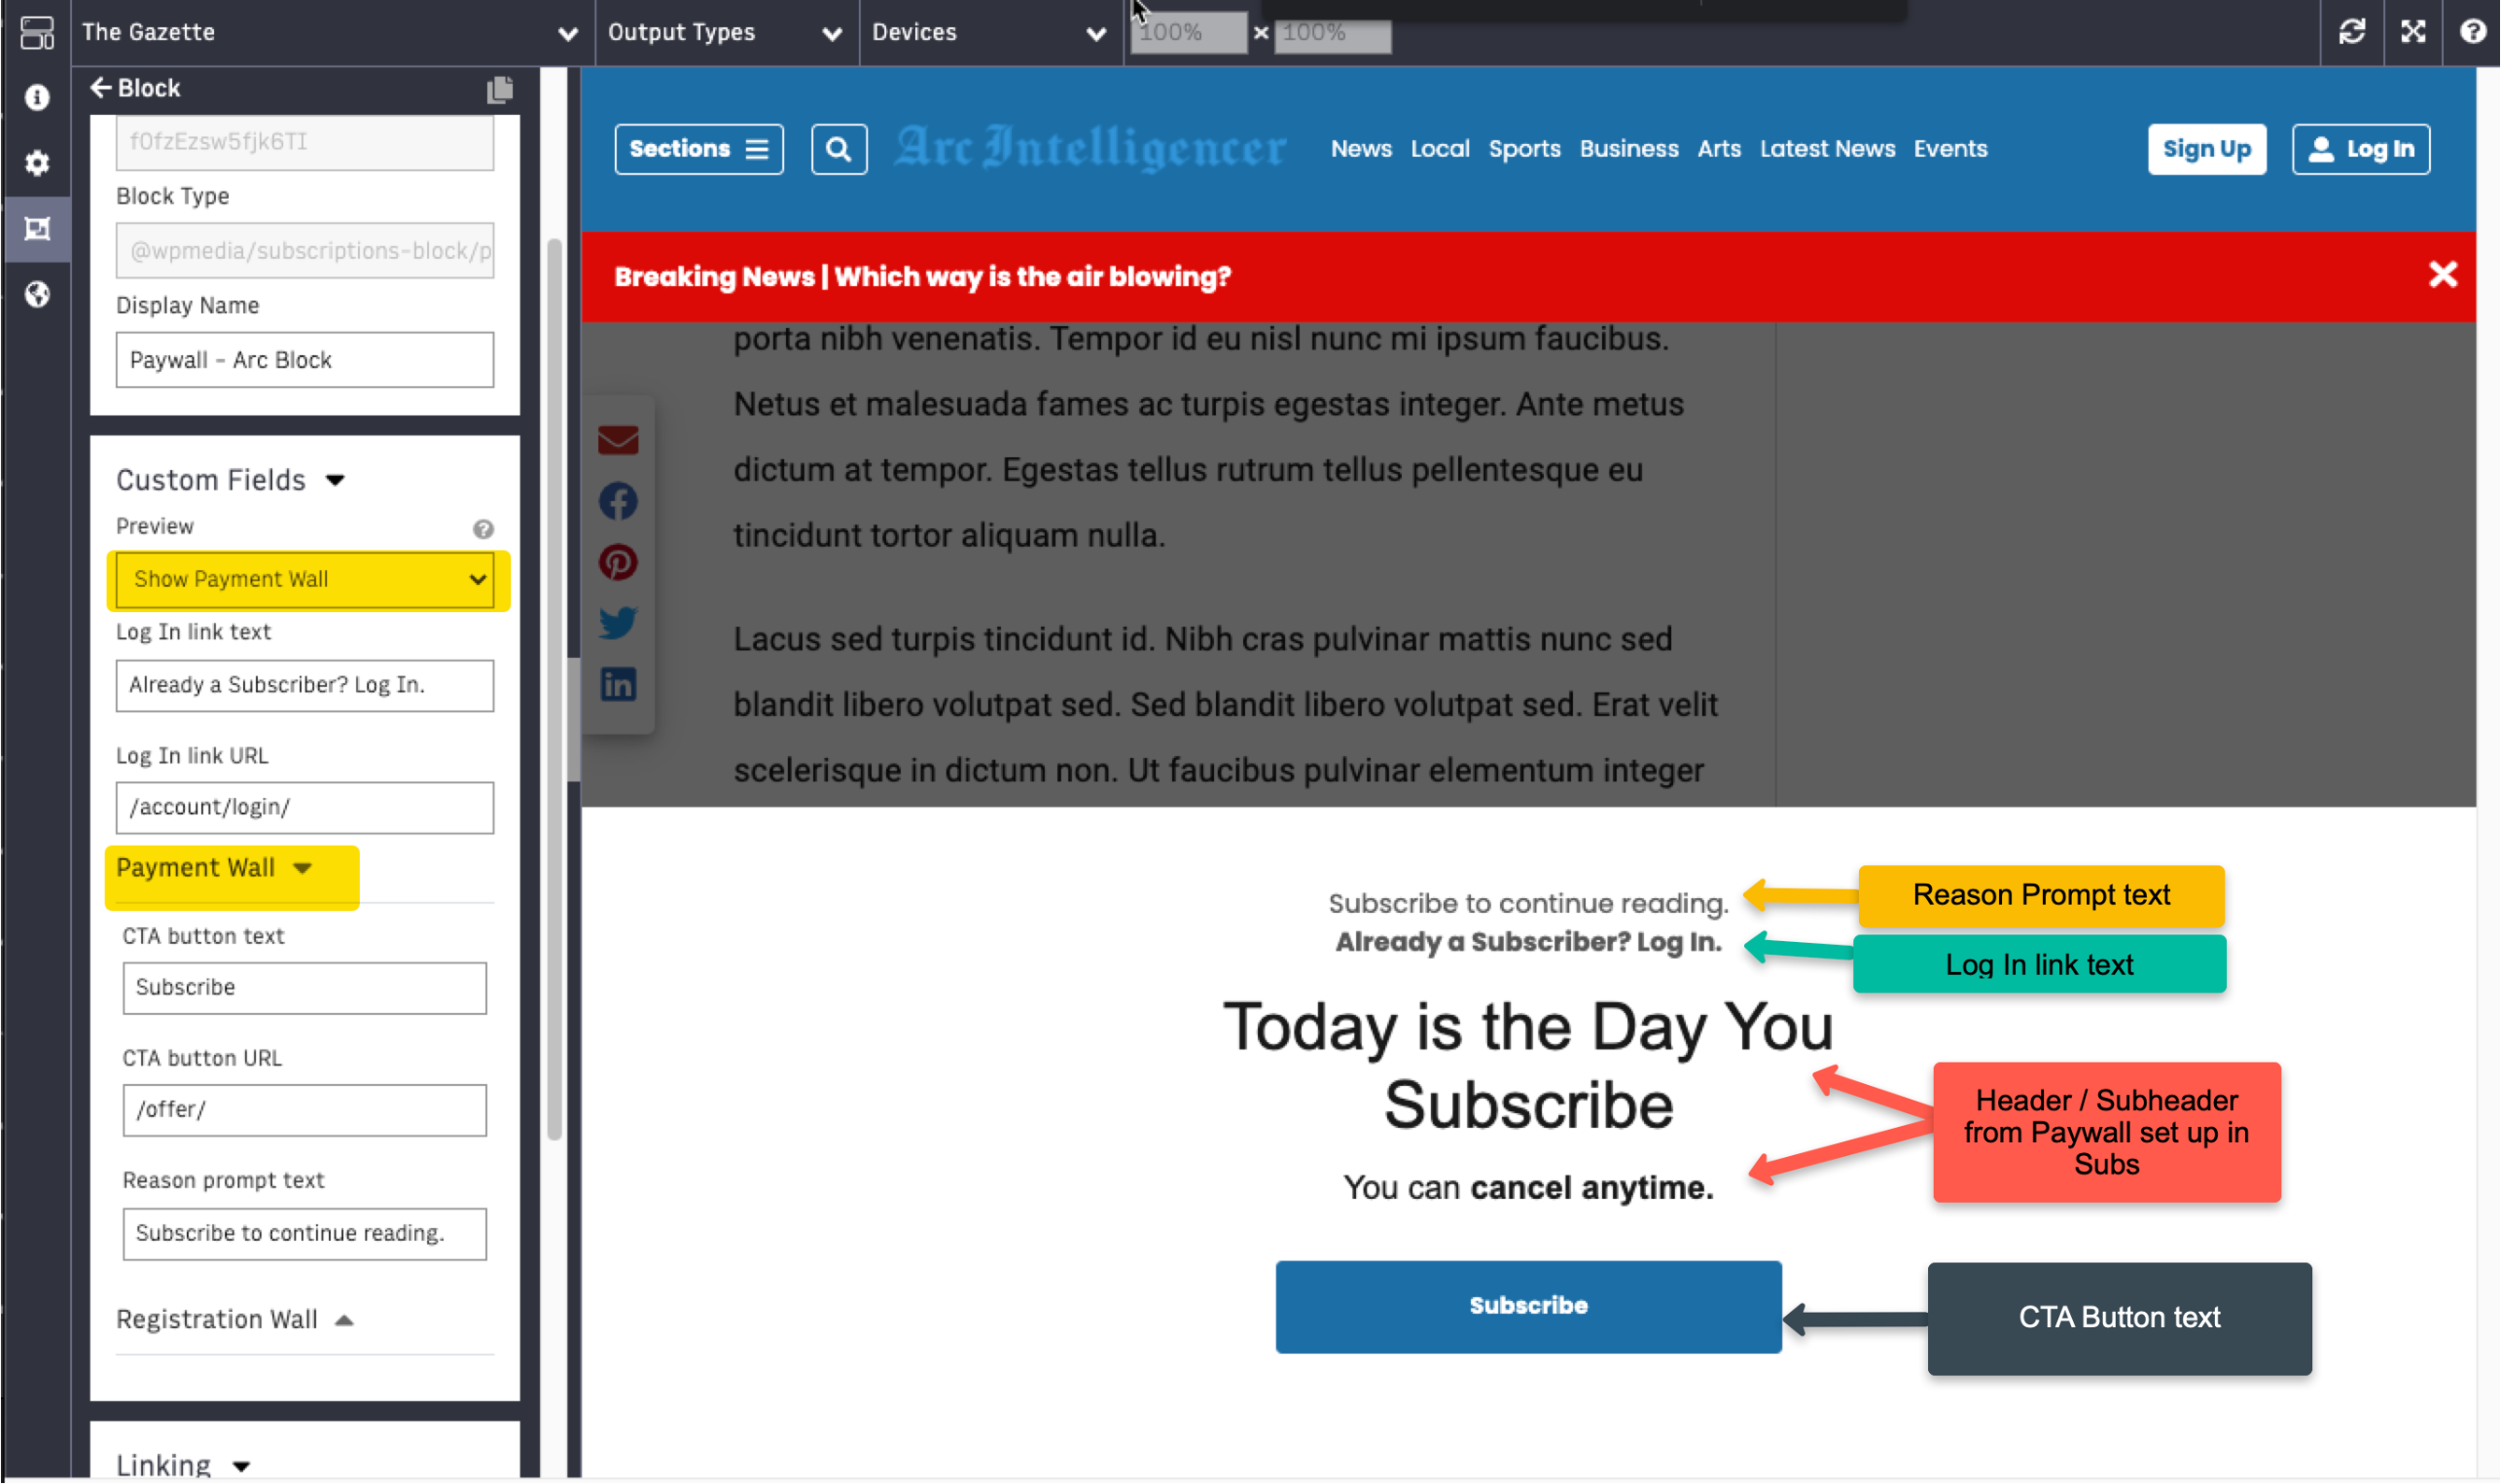
When using the Paywall block as a Paywall, the Header and Subheader text will auto-populate with your default offer and live Paywall in Arc Subscriptions. You may also enter additional copy directly in PageBuilder as custom fields on the block. These fields include a Reason Prompt text (for instance, “Subscribe to continue reading.”), Log in Link text that takes a user who may already have an account to a Log In page (for instance, “Already a subscriber? Log in.”), and a Subscribe button.
Payment Wall
 |
Custom Fields
General:
Payment Wall:
Registration Wall:
Creating an Offer page
Subscriptions - Offer - Arc Block
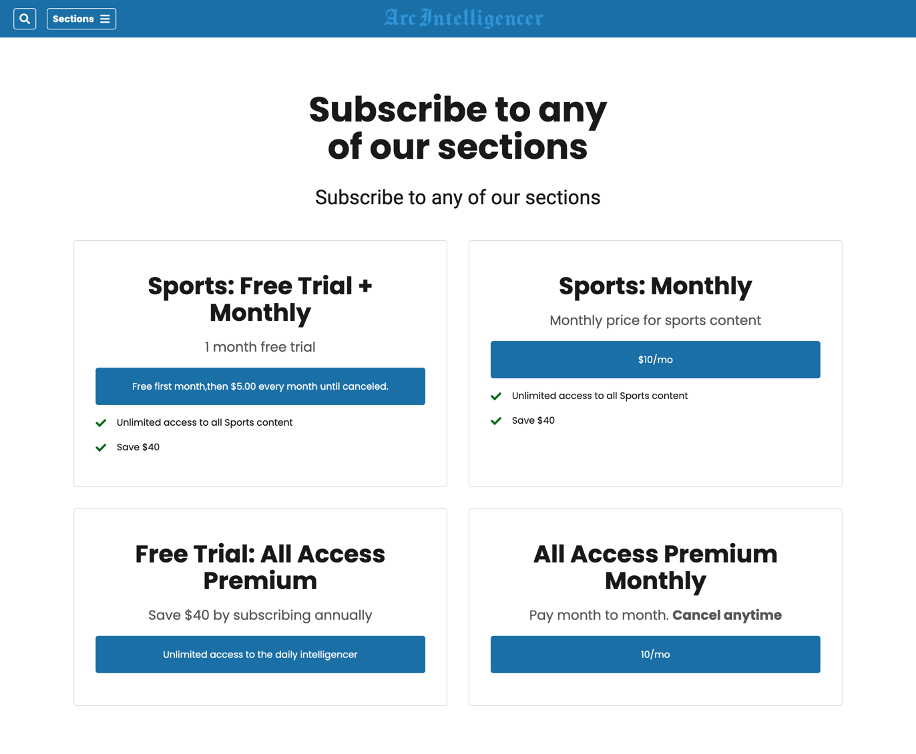
The Subscriptions - Offer block is placed on an Offer page and is where a user can select an offer to purchase. The block automatically pulls in product information from the offers set up in the Subscriptions application. You may also use variations of the Offer page to create marketing landing page experiences by adding the campaign parameter of “&campaign=[campaigncode]” to your offer page URL.
To use the Offer block, first create the Offer page:
In PageBuilder, click Create Page.
Set Page Name as Offer
Set Page URI as /offer/
In the Setup tab, under Layout, select Single Column - Arc Layout
In the Curate tab, add the Subscriptions - Offer block to the main section
Example
 |
Custom Fields
campaignCode - You may specify a campaign code as created in the Subscriptions application, or the default offer will be used.
loginURL - Set a login URL for users who are not logged in. Suggested URL: /account/login/
checkoutURL - Set a checkout URL for users who are logged in and ready to purchase. Suggested URL: /checkout/
Creating a Checkout Experience
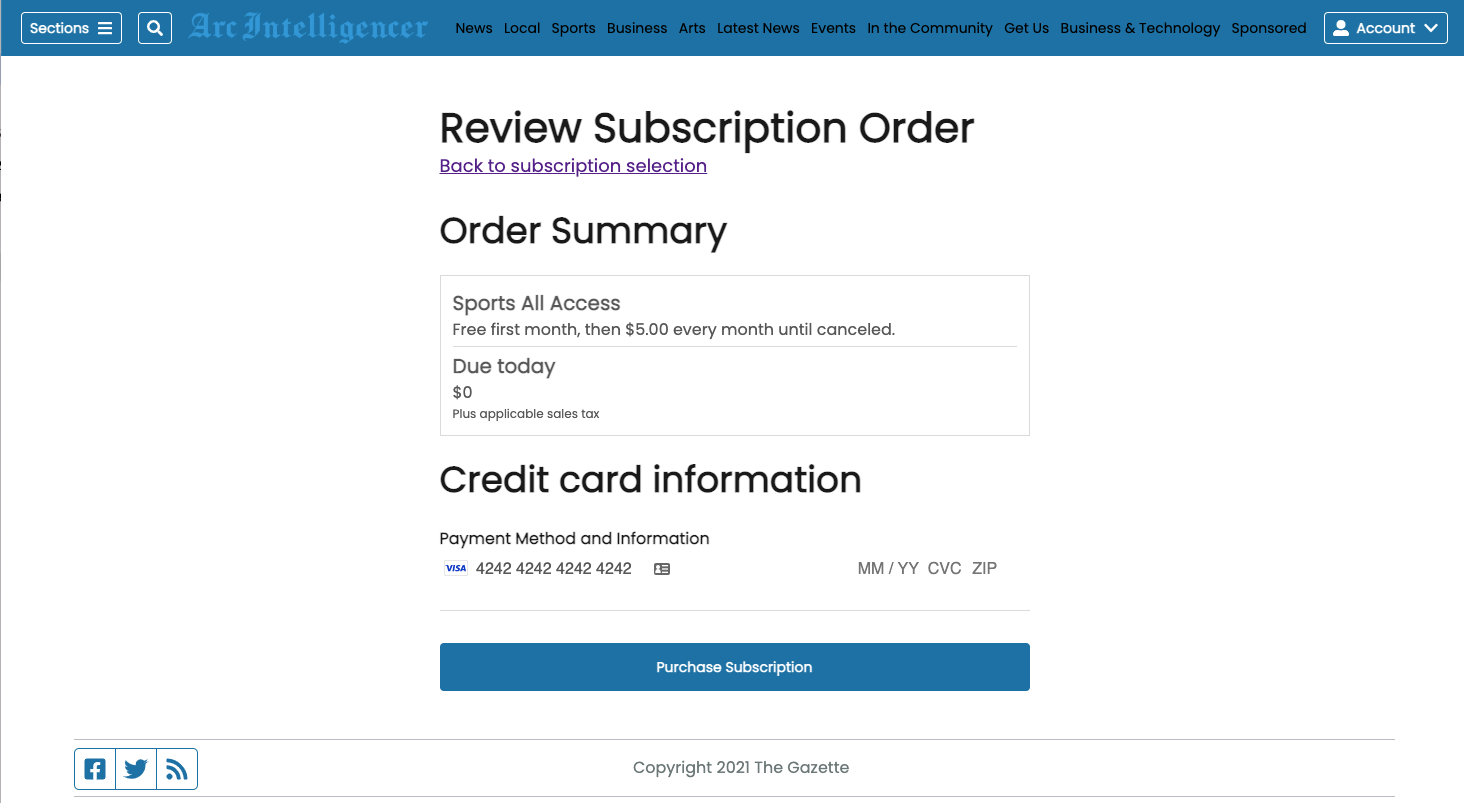
Subscriptions - Checkout - Arc Block
The Subscriptions - Checkout block is placed on a Checkout page where a customer will see their order summary, enter contact information, and submit a payment method. The block currently supports Stripe as a payment provider.
To use the Checkout block, first create the Checkout page:
In PageBuilder, click Create Page.
Set Page Name as Checkout
Set Page URI as /checkout/
In the Setup tab, under Layout, select Single Column - Arc Layout
In the Curate tab, add the Subscriptions - Checkout block to the main section
 |
Custom Fields
offerURL - This is the URL where a user would go back to select a different offer. Suggested URL: /offer/
Success URL - Set a URL where a user will go after the purchase is successful. Suggested URL: / or /account/profile/
Creating a Subscriptions Management Experience
Once you have configured your Paywall, Offers, and Checkout experiences, you are ready to test out your entire flow. With the Identity and Subscriptions blocks set up, users are able to:
Read a budget of free content until they run into a registration wall
Sign up
Log in
Read more budgeted articles until you run into a paywall
Select an offer from the offer page
Check out the selected offer
Manage their account from a logged-in state
Choose “Forgot Password?” from the login page