How to Configure Sign In With Google with Arc XP Identity
Arc XP Subscriptions is compatible with Sign In With Google, and methods are available if you use Google's login service.
You have two options to integrate Sign In With Google and Arc XP Identity in your app:
@arcxp/react-sign-in-with-google React Component library.
Note
You must request access to this repository. Contact Arc XP Customer Support.
JavaScript with Arc XP Identity SDK and Sign In With Google SDKs
We currently support only the popup (JavaScript) mode for Sign In With Google.
@arcxp/react-sign-in-with-google makes use of the Identity.signInWithGoogle SDK, so this too implements the popup mode of Sign In With Google.
Calling Identity.logout also disables auto-select and automatic sign in when using Google One Tap.
Pre-configuration for Google
Before you add Sign In With Google to your site, you must configure an authentication provider in your Arc XP Identity Authentication Provider Settings.
If you already have an authentication provider created for Google, you may skip this step.
Navigate to your Google Cloud Console OAuth Client Credentials page, which should look like the following:
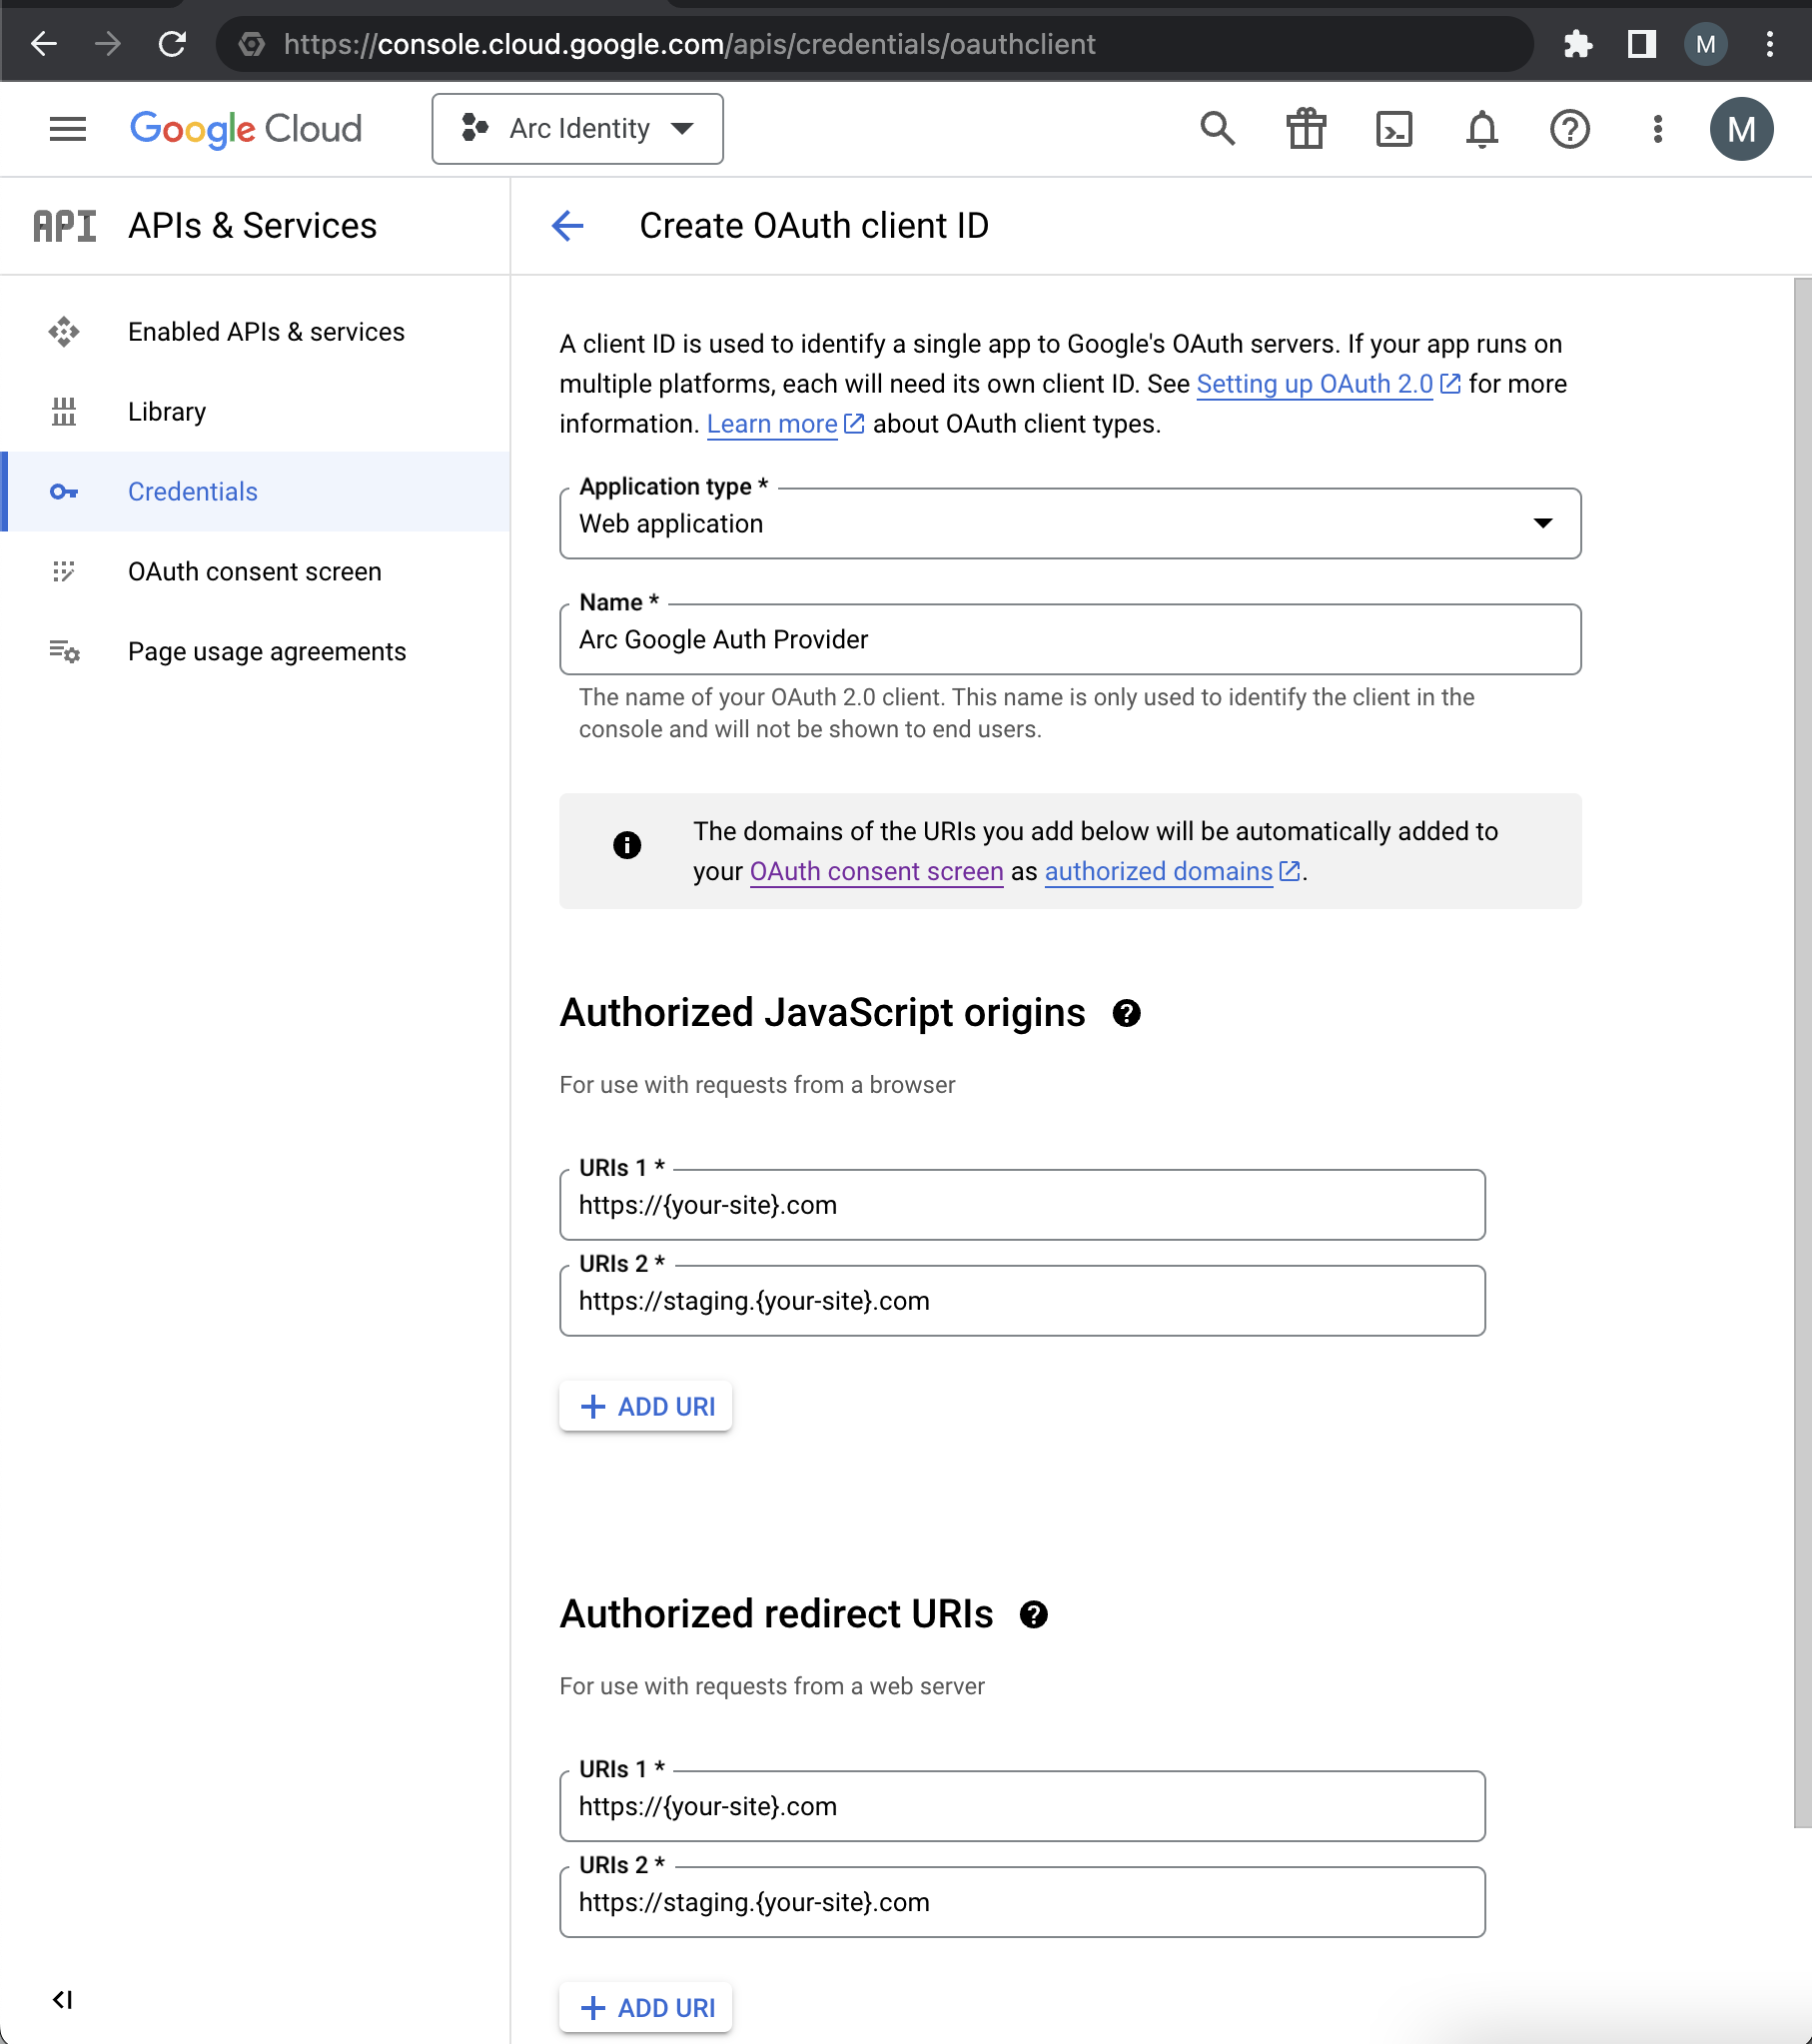
Add the domains for your site to the Authorized JavaScript origins and Authorized redirect URIs sections.
You can also add origins and URIs for your test or staging environments, including local developer environments, but we suggest creating a second set of OAuth Client IDs for your test and developer environments.
After you add your origins and URIs, click Create, after which you should be presented with your Google OAuth Client ID and Secret.
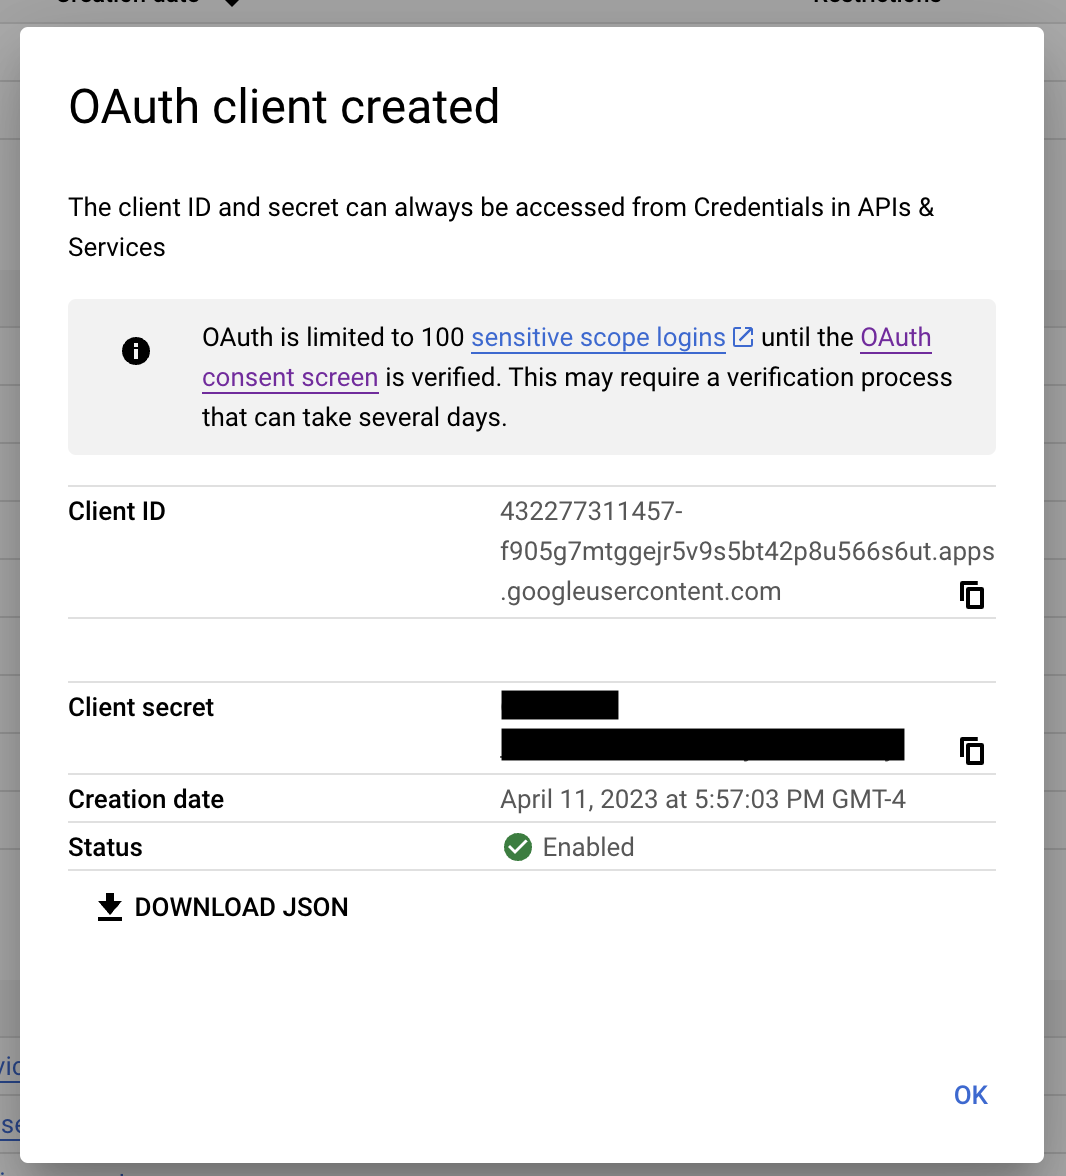
Save the Client ID and Secret in a safe place.
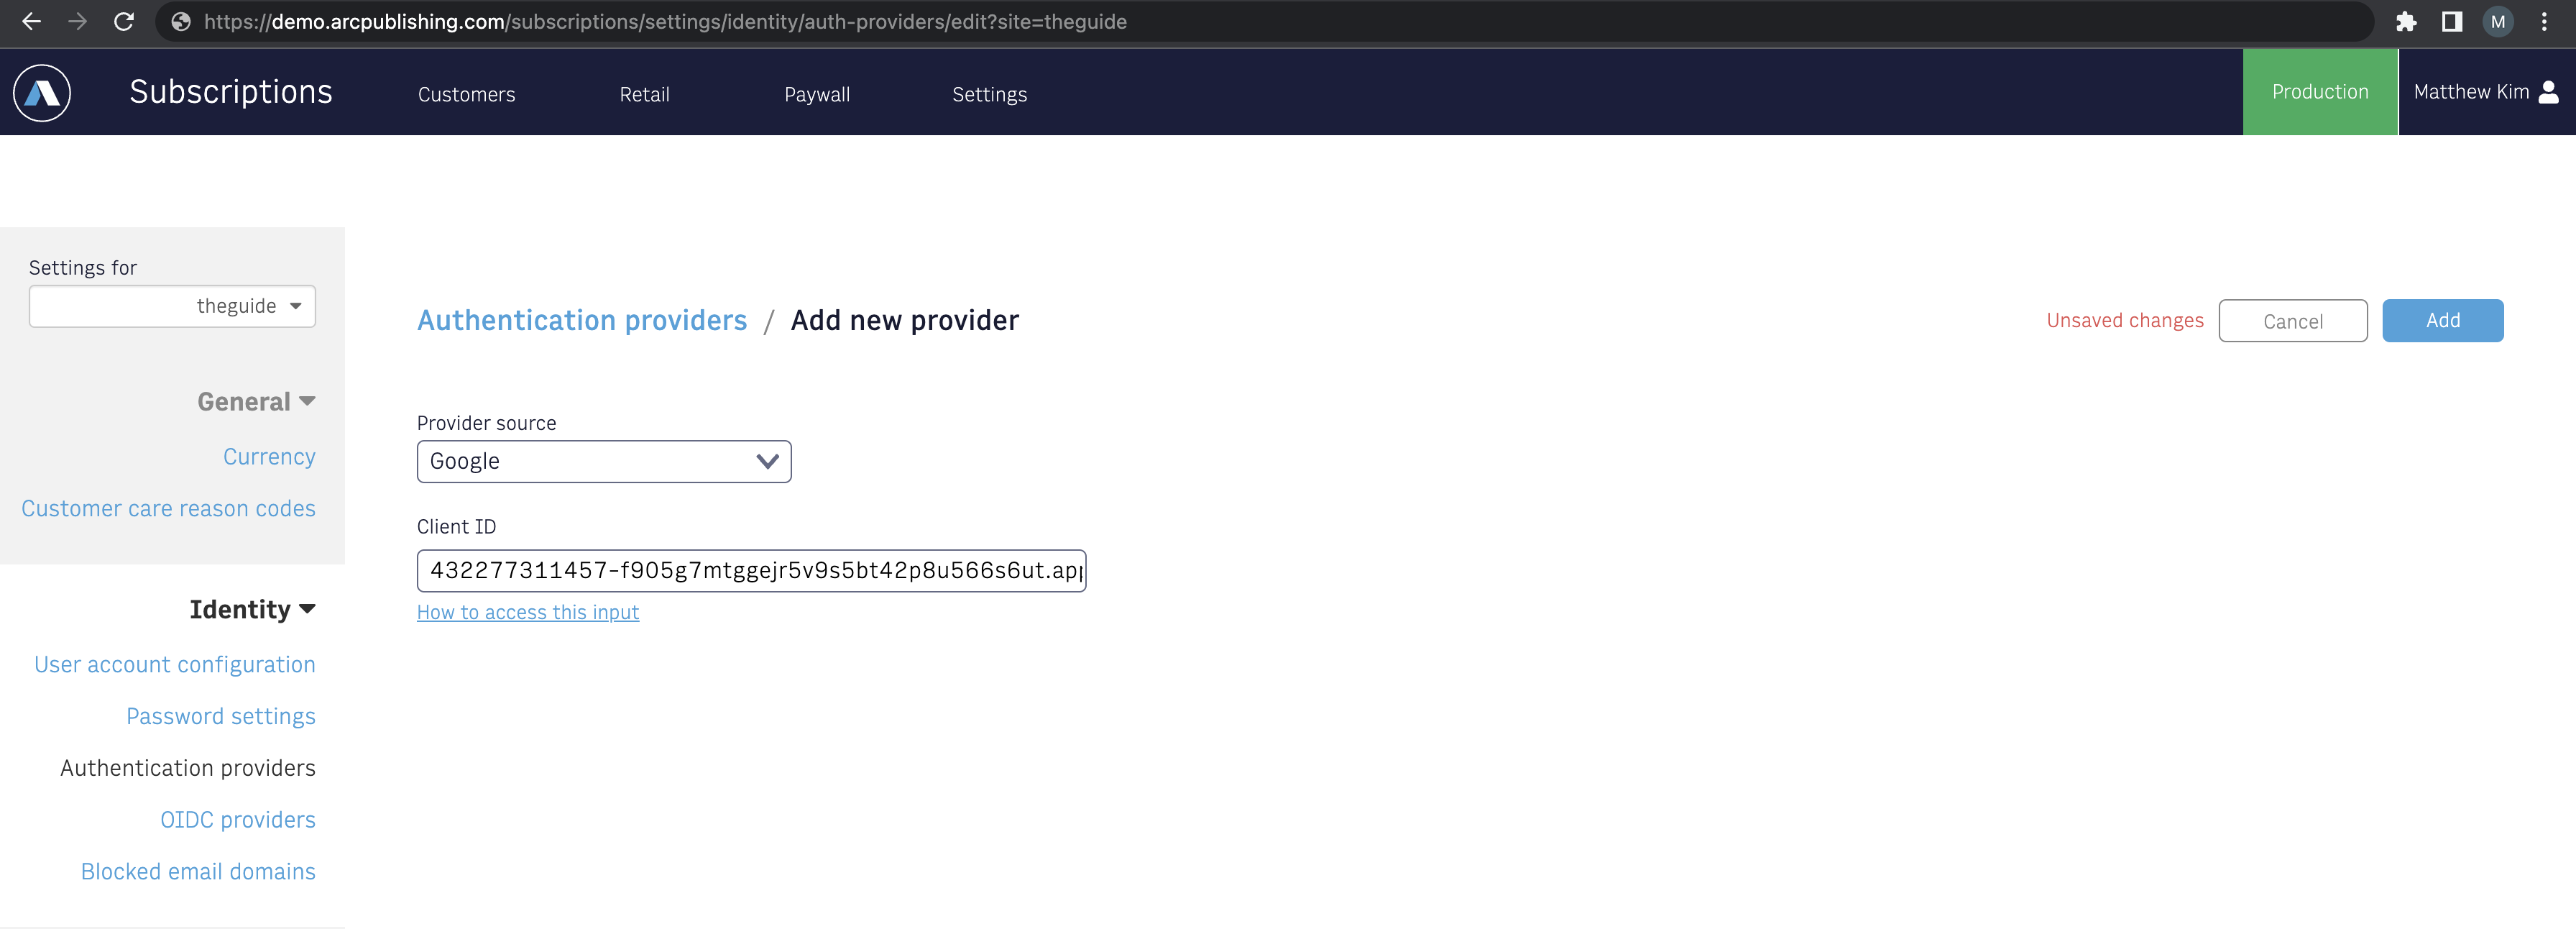
Follow these steps to add Google as an Authentication Provider to Arc Identity:
Navigate to your Arc Identity Authentication providers settings page.
Click Add provider and select Google as the Provider Source
Copy and paste Client ID from the Google page to your Arc Identity Authentication Provider Settings.
Note: You can set up multiple Client ID/Client Secret pairs (because Google Client ID is equal to Client Secret). To add multiple pairs, you must add those values separated by commas.
 |
Click Add, and you've successfully added Google as an Authentication Provider.
React Implementation using @arcxp/react-sign-in-with-google
If you are on a React-based app, we recommend you use our @arcxp/react-sign-in-with-google React components. This is the recommended approach for PageBuilder sites as well.
Non-React-based sites can use the Identity.signInWithGoogle SDK but require more developer effort to integrate. See the next section if you are not using a React-based site. Otherwise, continue in this section.
The React components are the easiest way to start using Sign In With Google, and they perform much of the setup and integration for you.
Installation
You must first have read access to the @arcxp Github Package repository. If your Github account does not have read access to the Github Packages under the @arcxp Github org, reach out to your TAM. Add your Github developer token to your .npmrc file, then install the package to your React project.
npm install @arcxp/react-sign-in-with-google
yarn add @arcxp/react-sign-in-with-google
ArcSiwgContextProvider
@arcxp/react-sign-in-with-google makes use of the context/provider pattern to scope your Identity & Sign In With Google configuration to a tree of components in your React application. The ArcSiwgContextProvider performs the setup and initialization steps outlined in the Sign In With Google documentation.
When it is mounted in your application, it will:
Load the Sign In With Google client library
Call
google.accounts.id.initialize()Optionally render the Google One Tap experience
import React from 'react';
import { createRoot } from 'react-dom';

import ArcSiwgContextProvider from '@arcxp/react-sign-in-with-google/lib-esm/ArcSiwgContext';
import Identity from '@arc-publishing/sdk-identity';

export const App = ({children}) => {
  Identity.options({
    apiOrigin: 'your API origin here'
  });

  return (
    <ArcSiwgContextProvider
      arcIdentity={Identity}
      displayOneTap
      onLoginSuccess={() => {
        // remove regwall or redirect to profile page
      }}
      onLoginFailure={e => {
        console.error(e);
      }}
      googleIdConfiguration={{
        auto_select: true
      }}
    >
      {/* Your app here */}
    </ArcSiwgContextProvider>
  );
};

const container = document.getElementById('app');
const root = createRoot(container);
root.render(
  <App/>
);
onLoginSuccess: function. The "default" onLoginSuccess that is called after the user successfully signs in with Google & receives valid credentials from Arc Identity. Provide a function to perform post login actions such as:
removing any registration walls
updating UI state to indicate the user is logged in
redirecting to the home/profile/etc. page as appropriate
onLoginFailure: function. The "default" onLoginFailure that is called after the user fails to log in successfully with Google. Provide a function to perform post login failure actions such as displaying errors.
googleIdConfiguration: object. takes all the fields described here https://developers.google.com/identity/gsi/web/reference/js-reference#IdConfiguration displayOneTap: boolean. if this parameter is set to true, AND the user is logged out from Arc Identity's perspective, the Google One Tap prompt will render to the user.
ArcSiwgButton
ArcSiwgButton renders the Sign In With Google button & can be used for user login and registration. This component MUST be rendered as a descendent of ArcSiwgContextProvider in your component tree. ArcSiwgButton accepts optional "onLoginSuccess" and "onLoginFailure" props that, if defined, are used instead of the default "onLoginSuccess" and "onLoginFailure" functions provided to ArcSiwgContextProvider as props.
import React from 'react';

import ArcSiwgButton from '@wpmedia/react-sign-in-with-google/lib-esm/ArcSiwgButton';

export const Login = () => {
  return (
    <>
      <h1>Login</h1>
      <>{/* login form here */}

      <ArcSiwgButton
        gsiButtonConfiguration={{
          type: 'standard',
          theme: 'outline',
          size: 'large',
          text: 'signin_with',
          shape: 'rectangular',
          logo_alignment: 'left',
          width: '400'
        }}
        onLoginSuccess={() => { // overrides the default "onLoginSuccess" passed to the closest ancestor ArcSiwgContextProvider
          history.push('/profile');
        }}
        onLoginFailure={(e) => {
          console.error('error logging in', e);
        }}
      />
    </>
  );
};
You've now successfully added Sign In With Google and Arc Identity integration to your site.
JavaScript implementation
If you are not using a React or PageBuilder based site, Arc XP Identity supports implementing Sign In With Google using the JavaScript Arc XP Identity SDK directly.
The Identity.signInWithGoogle method accepts the Google OAuth credential response and passes the credentials to the Arc XP Identity API to exchange for Arc XP Identity access and refresh tokens. Use Identity.signInWithGoogle to pass as callbacks to the Sign In With Google SDK.
Follow these steps:
Load the Sign In With Google client library in your
index.html.
<html>
  <head>
    <script></script>
  </head>
  <body>
  </body>
</html>
Initialize the Sign In With Google library and Identity SDK. When the Google client library loads on the page, initialize the Arc XP Identity SDK and Google client library. Remember that Arc XP Identity supports login through only the popup mode when specifying optional Google ID Configuration values. For more information, see the following sections in Google Identity's documentation:
// index.js
import Identity from '@arc-publishing/sdk-identity';
window.onload(() => {
  // initialize Identity SDK
  Identity.options({
    apiOrigin: 'your api origin here'
  });
  if (!google?.accounts) {
    throw new Error('Google client library is not loaded.');
  }
  const config = await Identity.getConfig();
  const googleClientId = config?.googleClientId?.split(',')?.[0]; // if you have more than one google client ID configured in Arc Identity, they are stored as a comma delimited string
  const googleIdConfig = {
    client_id: googleClientId,
    callback: (credentialResponse) => {
      return Identity.signInWithGoogle(credentialResponse)
        .then(() => {
          // handle successful login
        }).catch(e => {
          console.error('error logging in', e);
          // handle login failure
          // for instance, display error message,
        });
    },
    auto_select: true
  };
  google.accounts.id.initialize(googleIdConfig);
});
Render the Sign In With Google button. When the Arc XP Identity SDK and Google client library are both loaded and initialized, you can render the Sign In With Google button. In your login page, include a
divwith a unique ID for your Sign In With Google button. We use this ID to tell the Google client library where to render the Sign In With Google button.
  <body>
    <div id='sign-in-with-google-button'></div>
  </body>
Then, in your
index.js, add the following code after where you callgoogle.accounts.id.initialize().google.accounts.id.renderButton( document.getElementById('sign-in-with-google-button'), { theme: 'outline', size: 'large' } );
Open the One Tap prompt. To open the One Tap prompt, call
google.accounts.id.promptafter the Google client library loads and initializes. Before you call this function, however, you should make sure the user is not already logged in to Arc XP by usingIdentity.isLoggedIn. See Method: google.accounts.id.prompt in Google's documentation.Review your solution. When finished, your app might look like this:
<!-- index.html -->
<html>
  <head>
    <script></script>
    <script></script>
  </head>
  <body>
    <h1>
      Login
    </h1>
    <div id="sign-in"></div>
  </body>
</html>
// index.js import Identity from '@arc-publishing/sdk-identity'; window.onload(() => { // initialize Identity SDK Identity.options({ apiOrigin: 'your api origin here' }); if (!google?.accounts) { throw new Error('Google client library is not loaded.'); } const config = await Identity.getConfig(); const googleClientId = config?.googleClientId?.split(',')?.[0]; // if you have more than one google client ID configured in Arc Identity, they are stored as a comma delimited string const googleIdConfig = { client_id: googleClientId, callback: (credentialResponse) => { return Identity.signInWithGoogle(credentialResponse) .then(() => { // handle successful login }).catch(e => { console.error('error logging in', e); // handle login failure // for instance, display error message, }); }, auto_select: true }; google.accounts.id.initialize(googleIdConfig); google.accounts.id.renderButton( document.getElementById('sign-in-with-google-button'), { theme: 'outline', size: 'large' } ); Identity.isLoggedIn().then((isLoggedIn) => { if (!isLoggedIn) { google.accounts.id.prompt(); } }); });