Getting Started with Video Center
Welcome to Arc XP Video Center. This guide covers working with video-on-demand (VOD) or recorded video assets. If you are looking for more information on live video, see Getting Started with Live Video in Video Center. Now let’s jump in and get those great videos you have into the system and out to your readers.
Video Search
When you first arrive in Video Center, you will see options to search your VOD assets, with filters along the left. These will include the fields:
Filter by website - Which site or sites those videos have been circulated to.
Filter by section - If the website you chose in the previous field contains section, you can choose which website sections to view videos from.
Filter by author - Who is credited in the “editor” field.
Filter by type - Pre-configured starting templates that allow you to pre-populate meta information according to the kinds of videos your team produces.
Filter by time - choose the timeframe in which videos have been updated, for example, the last 24 hours
Filter by status - Whether the video is in “create” (being edited), “ready” (encoded but not published) or “published” (live and available to readers. These are not editable, like “workflow status”.
The search bar at the top of the page will search the following fields: title, blurb, tags, and keywords.
Note
Tags and keywords must be an exact match to return in the search.
In the video card view, you will see the thumbnail with the length of the published version, type, last updated date, primary website, primary section for that website, and the UUID with a copy button.
Creating a Video
After clicking Create Video, Video Center prompts you to define the type and primary website for the video. These two elements act as the foundational "parents" of the video, establishing its key characteristics. Type refers to the video category—such as a documentary, a wire video, or an explainer—and is defined by your organization. Additionally, the selected type may be tied to a template that pre-fills specific information in the video creation screen. The second element is the Primary Website. In a single-site environment, this defaults to your single website. However, in multi-site environments, you must choose which of your organization's websites serve as the primary host for the content. Keep in mind that while you can distribute content to other sections or sites, you must choose a primary website.
After defining these initial properties, you can upload the video. Click Upload New Version, select your video from your computer, complete the required fields (such as Title, which is a little further down the page), and click Save. The video must be in one of the following formats: mp4, m4v, mpg, mov, or mpg2.
You will notice that after you ask the system to save or publish, you will get status updates at the top of the screen as the video is processed. Make sure you fill out any required fields before hitting save. This will often prompt you to refresh the page, like this:
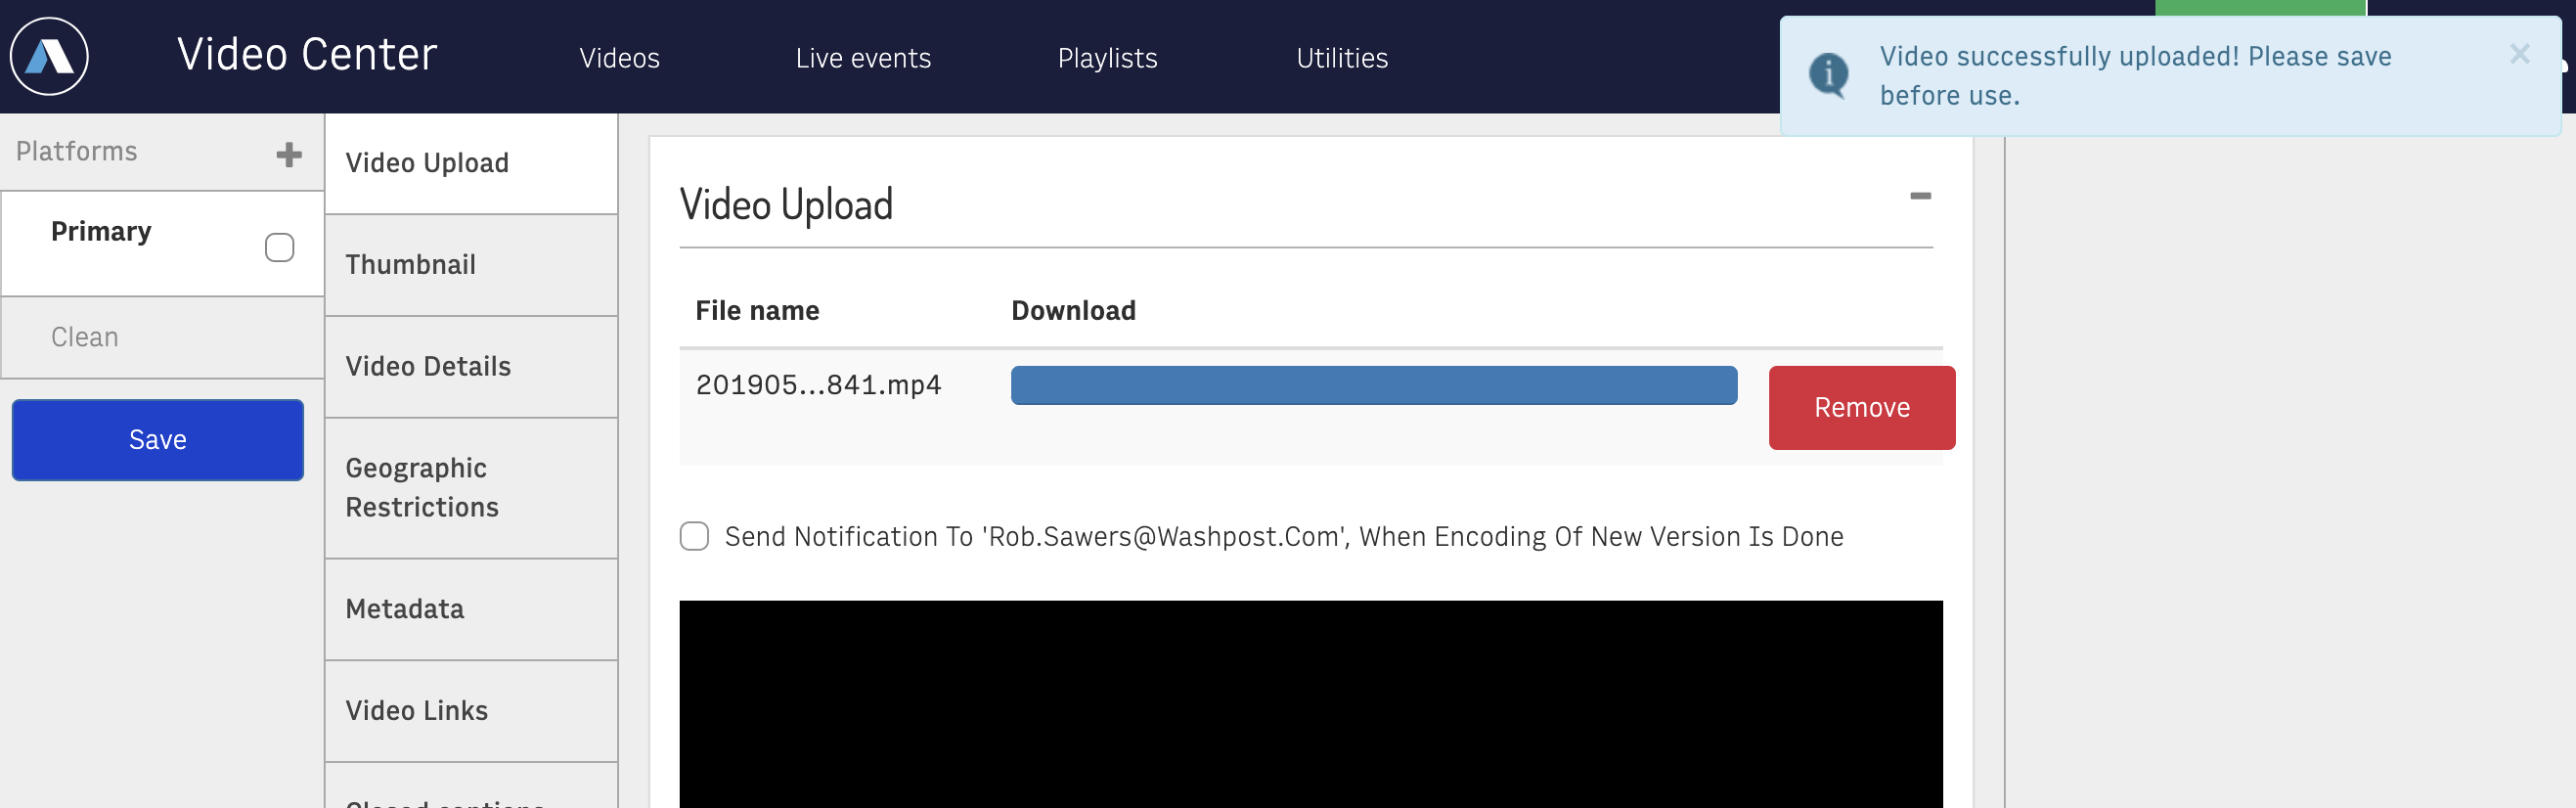
After the video has loaded, the encoding process begins, and you can monitor it through the status bar below the video preview. The status moves from Encoding to Submitted to Completed. When in the Completed status, the video is ready for you to add the info to and then publish. Let’s travel down the page and look at a few fields and options.
Versions
Video Center enables you to manage multiple versions of a video within a single video file. For example, if you adjust a video, you can upload the updated version directly to the existing video file, avoiding duplicate entries in Video Center and eliminating the need to maintain or delete the older version. To add a new version, follow the previous steps, beginning with Upload a New Version. Once multiple versions are uploaded, you can easily switch between them by selecting the corresponding radio button next to each file name.
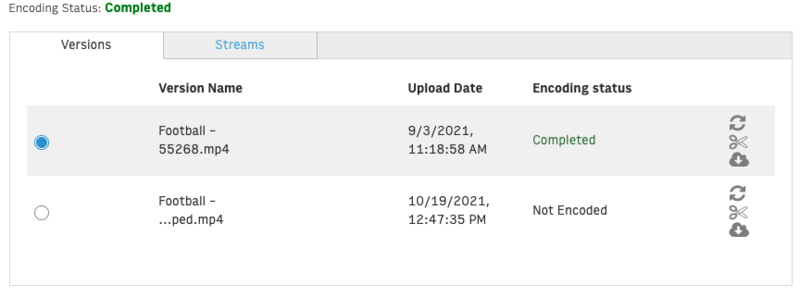
From the Versions tab, we can also ask the system to re-encode that version (like if a previous encoding failed), clip a section of that video (either as a new video file or as a different version) or download the video to your computer.
Clipping videos
The clipping functionality offers you a powerful way of creating new clips or VOD assets from an existing video, new versions of the video you are working with, or even a YouTube-specific version that can be automatically synced with your YouTube channel. Under the Versions tab, click the small scissors icon for the version you want to clip. This will pop up a new modal that will give you different aspect ratios at the top: Horizontal, Vertical, or Square. Below that, you will have the start and end points for this new clip, along with arrows that will allow you more granular control. The red dot signifies the frame in the preview. At the bottom, you will see the ability to apply a new title (used when making a new VOD or saving to the platform), followed by three options for what to do with this new clip:
Save to Platform- Allows you to save a new version of this video to a platform. Currently Video Center is only supporting YouTube as an outside platform. Once saved to YouTube, you will see a new option in the upper left “Platforms” menu that will allow you to control that targeting and metadata independently.
Save as Version- This allows you to turn this clip into a new version of the video, that once encoded, can be set as the live version for this video file. See versions above for more information.
Create Clip- This will create an entirely new VOD asset in the library that you can use completely independently. If you select this option, a popup menu in the upper right will give you a link to that new VOD file.
Streams
The Streams tab will show you the various streams or renditions of this video that will be served up to the player based on the size of the viewport. These will be automatically created based on your organizations video subscription.
Thumbnail
After versions, you will be able to either create or upload a thumbnail image. Click “Create Thumbnail” to choose a single frame from your video to use as the thumbnail. If you choose to upload a thumbnail images, make sure it is in .jpg format and preferably 1920 x 1080px. You can also click on the “Search and Upload Images” button to add and/or select an image from Photo Center. The video will need to be re-encoded once a thumbnail has been added.
Video Details tab
The Video Details tab is where you will set important information for your video, such as:
Distributor- The Distributor fields in Video Center allow multi-site users to set website restrictions on a single video file. Video Center integrates with Global Settings, where Distributors are managed across an organization. For more information on distributors, see Managing distributors.
Credit/Editor/Host/Talent/Contributor- Several available fields that allow you to properly credit the users involved in this video. The “editor” field is the one that is searched on the video homepage and is the field used by default in Themes blocks.
Type- As mentioned above, a customizable field that describes the kind of video this is
Website/Section- where this video will be circulated or published to. Use the “View Selected Websites” to add additional sites and sections.
Title- Main title or headline for this video
Metatitle- A non-reader facing field meant for SEO purposes. Include keywords whenever possible.
Caption- A shorter caption or description, used where this video is embedded.
Blurb- A longer description field that is used on standalone video pages or on YouTube. Unlike Caption, does not have a character limit.
Display Date- Ability to edit this reader facing date field, if you want to perform a “quiet edit”, such as fixing a typo.
Publication End Date- Allows you to set a time when the video will become unpublished.
Redirect URL- Not currently an active field, do not use.
Geographic Restrictions
You can restrict certain videos, or entire categories of videos, from playing for audiences in specific regions. Geographic Restrictions can prevent viewers in a specific region from accessing a video or live stream, or they can allow them only in a particular region. Geographic restrictions are configured on Global Settings page in Arc XP. See Managing geographic restrictions.
Metadata, Video Links and Closed captions
In the Metadata tab, you see the following fields:
Keywords- terms used for better SEO performance
Tags- for organization and search functionality within Video Center or on your website.
Playlists- a playlist is a way within Video Center to set a queue for videos to control what plays next. You can create and edit playlists through the Playlist tab at the top of the screen. To add a video to a Playlist, add the playlist tag, and after you save, the system adds the video to that list.
Note
Playlists have a Playlist Position One option that currently does not work. This is a known issue, and we'll update the documentation when it's fixed. This option should let you set a video to play at the beginning of a playlist.
In the Video Links tab, you will see the following:
Add related content- which can be shown on standalone video pages on your website.
Short URL/Permanent URL- Once the video is published, these will be auto-populated based on the patterns set in the Canonical URL tool.
Embed Codes- Auto-generated embed and iframe code snippets for embedding this video off-site.
Where embedded- A list of articles where this video is being referenced on your website(s).
The Closed Caption tab enables you to upload a .srt or .txt file. We also offer the ability to sync with an outside CC provider.
Remaining tabs
Under the Ads tab, you may override this video's ad zone settings and toggle things like pre-roll ads.
Second to last is a WebSked tab, where you can add the video to a Collection, pitch it to a platform, and set the “Planned Time” for this video. “Planned Ready Time” is used to communicate to your editors/team when this video should be ready to be ready to use online.
The “Advanced” tab will give you some further, less used options. You will also find an audit trail of all the events that have happened in this video file. At the very bottom of this tab is a “delete” button for removing this video from the system completely, if you have the proper permissions.
Important
The “Advanced” tab is only visible to users who have that permission, so depending on your permission level, you may not see this tab in your interface.
Publishing
When all of your video has been encoded properly and all of your data is entered, it's time to publish. In the upper left panel, you will see the “platforms” you have set up for this video. The primary will be the version of the video that will be used on your site, but you might also choose to set up an integration with YouTube. Clean is not a reader-facing platform, but it will allow you to store additional versions of this video if you choose. Select the check box next to the platform you want to publish (generally Primary) and the Save button will transform to “Publish selected”, as well as “Unpublish selected” if the video has already been published.
If you have a stand-alone video page or any automatically generated queries, “Publish” will mean this video is shown to your readers. If you are not pulling videos automatically, this will mean that this video is available to add to articles in Composer.