Getting started configuring your Arc XP tools
Starting on a new CMS can be confusing, especially one as broad as Arc XP. In order to help you take full advantage of the features in Composer, Photo Center, Video Center, and WebSked, follow this guide to the important options you have available.
Photo Center
▢ Source Name Settings - This determines which sources’ names you will display in filtering.
▢ Site Hierarchy - Here you will determine which hierarchy from Site Service will you tie into for Gallery publishing. For multi-site organizations, you may select a different hierarchy for each site.
▢ Field Options - These options impact the pre-filled Comments and Syndication options you display for new Galleries. “True” marks these options as yes/checked by default; “False” marks the options as no/unchecked.
▢ Additional Settings - There are a number of options to configure here if you would like to do so. In addition to determining a couple of default filtering options (Date Preference and Date Search Range), the main “Publish on Upload” is the key configuration within Additional Settings. This toggled field determines whether uploaded images are published by default.
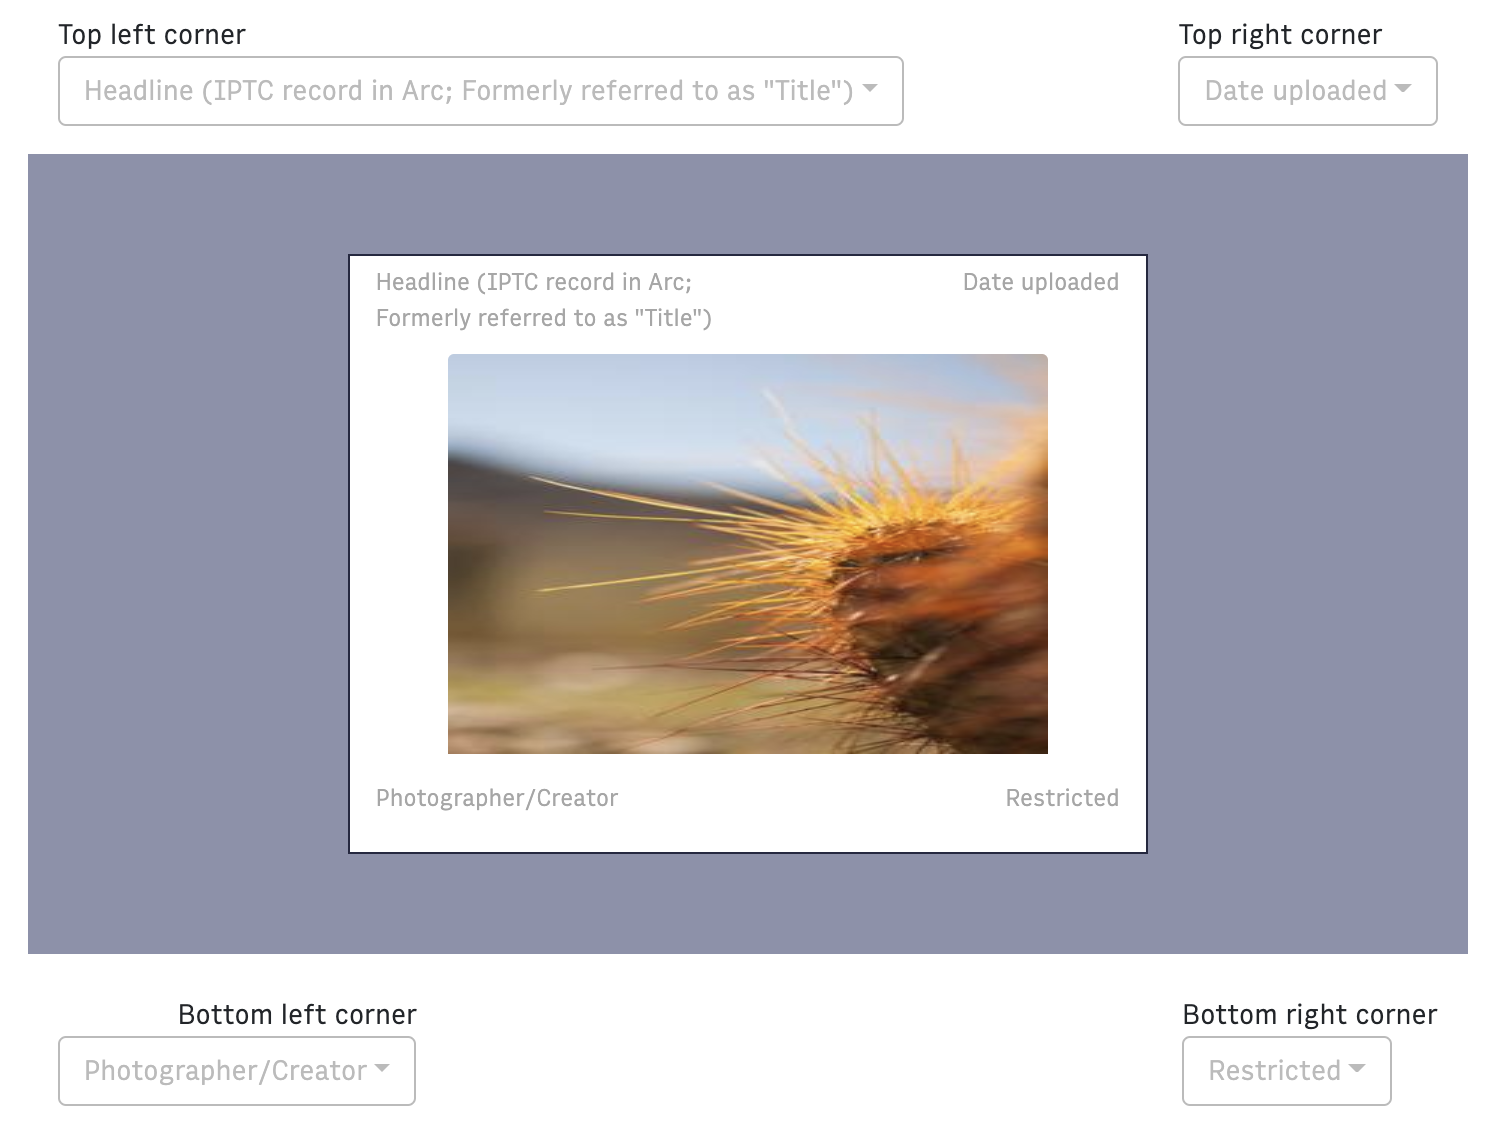
▢ Image Metadata Fields - For each image in the main image library in Photo Center, you can decide which four metadata fields you wish to expose in the four corners of the image. There are approximately a dozen options from which to choose, so you can select the metadata that will be most useful for your team.
 |
Settings -> Image Field Settings
▢ Manage Image Types - With these options, you will determine which image types you would like to allow for your organization. By default, images without the specified image type will be uploaded as “Photograph”. If you would like to have more granularity for Image Types, you may enable Graphics and Illustrations as additional types.
When you click on the name of each image type in the menu, you will be able to select the default metadata fields exposed for that image type (Headline, Credit, Keywords, Alt Text, etc.). You may also select which fields will be required in order to save images in Photo Center. You can make these default specifications unique for each image type if you would like to do so.
▢ Manage Templates - Similar to starting templates within Composer, you can create starting templates for your images in Photo Center. These may include certain default values, such as Keywords, Credit, Photographer, Restricted/Unrestricted, and more.
Video Center
Utilities
▢ Types - Types in Video Center are a way to categorize your videos, and they are similar to starting templates in Composer or Photo Center. They allow you the opportunity to pre-fill metadata fields and, in this case, include a watermark for each video type.
▢ Series - Series are a shell for multiple episodes of a show or broadcast. When creating a Series, you can associate tags, primary website and section, a header image, editor(s), related content and more.
Composer
Important
You must save your settings on this page to enable them. After you have made your selection and changes, ensure to scroll to the top of the page and click Save.
▢ Content Elements - These control which content elements (Gallery, Image, Video, Table, Social Media Embed, etc.) are available for your users within the Compose tab. From here, you can also add additional custom embeds for your organization.
▢ ANS Overrides - The “Owner Name” field sets the Owner. Name property in all documents created and edited in Composer for your organization.
▢ PageBuilder - The preview URL that will allow you to see a preview of your articles from within Composer must be captured by a resolver in PageBuilder. A guide to help you get this set up properly can be found here.
▢ WebSked - From here, you can determine whether or not to enable the WebSked integration within Composer (Workflow Statuses, Pitching, and Task Creation).
▢ Media Metadata - These settings limit the editable fields for images, videos, and Galleries when included in Composer, based on what you plan to expose on the site's frontend.
▢ Article Body Count Configuration - These settings affect the line and inch counts at the bottom of the Compose tab.
▢ Link Display Types - If you would like to use link lists on your site, you may build out your default list options here. These options will display in a dropdown menu when users include a link list content element in their story.
Note
This Link Display Types configuration requires set-up on the backend in order to render the different list types.
▢ Lock Settings - Decide how long you would like to allow a story to remain open (locked) and idle and when you would like a warning to appear to the user, letting them know their story is about to unlock due to inactivity.
▢ Featured Media - Here you will determine which featured media types you wish to enable for your organization (images, videos, galleries, etc.) and whether you would like to make any of these required in order to publish.
▢ Site Service - Enter the name of the site hierarchy that you want Composer to use in the “Hierarchy Name” field. This will be the site hierarchy that’s used everywhere in Composer, from search and filtering to picking which section to publish the story to.
▢ Text Content - Check the box in the field if you would like to remove empty paragraphs from your content.
▢ Search - Check these boxes if you would like to display the Slug and/or Budget Line on each story card within Composer.
▢ Story Unsaved Changes - Check this box if you would like users to receive a warning message prior to navigating away from a story containing unsaved changes.
▢ Proofreader Settings - Currently, Composer features integrations with two different third-party dictionary tools—Tansa and ProLexis. If your organization uses one of these options, you may fill out these fields to tie the dictionary tool into Composer.
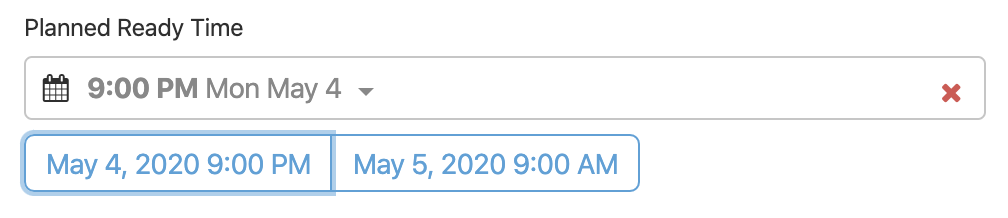
▢ Time - Whereas your organization’s timezone settings, including Time Format (12-hour/24-hour) are controlled from within Global Settings, within Composer Settings you are able to configure the Planned Ready Time and the Schedule Publish Quick Pick Times for your organization.
▢ Story Tabs - If you would like your users to have access to all tabs prior to saving their stories, click this box. This box is unchecked by default so that users will be prompted to fill out necessary metadata fields, such as primary site/section, working headline, etc., in order to be able to publish without issue.
▢ Print System Integration - If you would like to display the “Send to print” button on the Compose tab, you can check this box and include the URL path to your print CMS system. See How to set up Send to Print functionality in Composer.
▢ Enable Snowball Integration - If your organization utilizes the Snowball stock quote recommendation feature, you can choose to enable this on the Meta tab within Composer. This will require some additional configuration and support from Arc to get established properly.
▢ Default Search Filters - If you would like to impose a default content source or time selection for your organization within the main Composer search screen, you will set that up here.
▢ Disable Editor Plugins - There are a couple of plugins integrated within Composer. If you wish to disable these plugins, make your selections in this field.
▢ Author Edit - By default, the author information shown on the frontend (Byline, email, role, etc.) is populated by the Authors tool. If you would like to allow authors in your system to override these values, you may specify those options here.
▢ Kickers/Labels - With Kickers/Labels you are able to create customized labels for your content that, when configured, will appear on the frontend. You also have the ability to associate a URL with each label so that when a user clicks on the label, you can direct traffic to a specific destination.
▢ ANS Meta Field Configuration - With these options, you are able to control which fields appear on the Planning and Meta tabs within a story as well as whether or not you want to require circulations to be in place in order to save content. By clicking on the gear icon for each option, you can also determine if the field is required to save and/or publish the story, and whether or not the option contains a picklist. There are dozens of fields available to you depending on your organization’s requirements, and you may configure these options with drag-and-drop functionality.
▢ Base Paths for Websites - Once stories are published in Composer, you can set up a button to take users straight to the live article page. This button is represented as a globe icon in the top toolbar. It will take you to the primary website for that story. For configuration instructions, see this Documentation on how to configure the base URLs.
Templates
Within this tab, you will be able to create starting templates to pre-populate metadata fields in the Planning and Meta tabs (site/section, author, kickers/labels, paywall status, tags, subtypes, and more) as well as include some content in the Compose tab. These starting templates speed up the process of creating a story within Composer and allow authors to focus on content creation.
Templates will be visible to all those with access to Composer, although those with permission to do so may choose whether or not to display a given template within the Template tab. Many organizations find that templates work best by section (sports, politics, etc.), type of content (opinion column, horoscope, etc.), and/or author. While all visible templates are available to all users, they are also searchable and easy to locate within the user interface.
WebSked
In order to access the WebSked Settings, you will access WebSked, then click on your name in the top right corner. From here, you will see the “Groups” and “Company” options.
Groups
▢ Groups - A “group” is a way of grouping task triggers and notifications within WebSked. These tend to be by desk or role (for example, Sports, Entertainment, Editors, Photographers, etc.)
▢ Task Triggers - Once you’ve created a Group, click on its name and, from here, you can set automated tasks that happen when there is a shift in Workflow Status within a story. For example, within the Editors Group, I may set a Task Trigger to create a Task any time a story shift from Any Status to Review and Edit status. The Workflow Statuses available to you will populate from Schemas (see below).
For each Task Trigger, you may specify a website, section, content type, and more to create the most targeted Tasks.
▢ Notifications - For each Group, you can control the notifications triggered by certain events (story publish, task create, platform pitch, etc.) These notifications can be communicated through Slack, Microsoft Teams, or e-mail.
Company
▢ Tasks - Within Tasks, you will set up Task Types. These are actions that occur with your organization’s content. Task Types might include “Review and Edit," “Photo Assignment,” “Translation Support,” “Video Edit,” “Legal Review,” and more.
Task Statuses describe the state where a particular Task finds itself within WebSked. WebSked is pre-populated with five default Task Statuses (Group Assigned, User Assigned, Claimed, Rejected, Completed), but you may create additional statuses, should your organization require them.
Task Templates are useful for Tasks that don’t occur often or with most of your content. Some sample Task Templates might be “Photo Assignment,” “Translation Verification,” or “Immediate Backread Needed.” Within these Templates, you may specify a Group or User who will receive this notification, contact information in order to complete the Task, special instructions, and more. When a user creates these Tasks from within Composer or WebSked, they will be prompted to fill out the necessary information in the Template provided.
▢ Schemas - Schemas is where you will establish the Workflow Statuses for your organization. By default, you will see “Draft,” “Edit,” and “Publish,” but you may create as many Workflow Statuses as are necessary for your organization. Remember that a change in Workflow Status is manual, and it is meant to communicate that an action must be performed with that piece of content. We are able to configure Task Triggers and Notifications based on these changes in Workflow Status. See Groups for more information.
▢ Platforms - Platforms within WebSked are destinations that are always looking for new content, such as Homepage, Social Media, etc. Users within your system may pitch their stories to these Platforms for consideration. You will establish a Path (for example, /homepage), a Title (Homepage), and a primary Website for each Platform you create.
▢ Configuration - Here you will determine several default options, such as preferred language and story length unit (words, characters, inches, etc.). You will also indicate your preferred hierarchy (from Sites) for finding stories within WebSked.
▢ Integrations - This is where you will integrate your organization’s Slack account and/or Microsoft Teams.
▢ Stats - With Stats, you will set your organization’s traffic percentage. These percentages will be visible on your Statistics page (from the main WebSked landing page.)