How do I Add Text Background Color through Composer
You can add background color to text if front-end logic is added to support it.
How to add text background color in a story
Select the text to which you want to add the background color. When the inline toolbar menu appears, click the highlighter icon. Select the color you want to use. An underline in the color you selected appears under the text. Composer uses an underline instead of a highlight because comment features in Composer use highlighting.
Select the text again to remove the background color and click the white box with a slash through it.
Text can have only one background color. If you try to add another color to the text, the text takes on the new color.
Using background colors on the front end
You cannot edit background colors through the Composer UI. Composer applies the default color configuration. Color configuration is stored in a customColors key in Composer settings. It’s represented as a JavaScript array. Each array element corresponds to one color. Each color object contains the following fields:
color- a color code is a standard HTML hexadecimal color code representation. It is in a form of #RRGGBB where RGB is a hexadecimal code of the color. For instance, #ff0000 represents red, #00ff00 is green, and #0000ff is blue.caption- caption is the tool tip text that appears when a user hovers over a color in the color picker. By default, it contains the color name.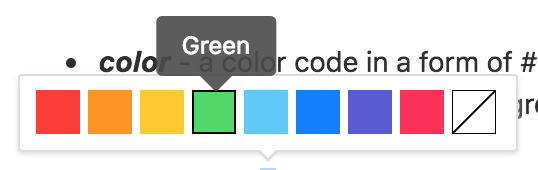
className- class name is used when Composer generates HTML markup. Composer uses HTML mark tags to represent color information. Class name should match the PageBuilder CSS class name, which adds the actual visual effect of the highlighted text.
Because Composer injects only the class name into the mark HTML tag, the Composer color code might not match the PageBuilder representation of the same color class. PageBuilder might apply any style for those CSS classes. Contact your PageBuilder implementation team to determine the meaning of each className.
Composer does not wrap mark tags. That means that if you apply a blue color over the red color, the resulting markup would contain something like this:
 |
<mark class="cl_blue">blue color </mark>
<mark class="cl_red">over the red</mark>
<mark class="cl_blue"> color</mark>
In other words, you can't create a mark inside a mark tag. Composer always ends one tag and starts a new one.
Here is an example of the default settings color configuration:
customColors = [
  {
    "color": "#ff3b30",
    "caption": "Red",
    "className": "hl_red"
  },
  {
    "color": "#ff9500",
    "caption": "Orange",
    "className": "hl_orange"
  },
  {
    "color": "#ffcc00",
    "caption": "Yellow",
    "className": "hl_yellow"
  },
  {
    "color": "#4cd964",
    "caption": "Green",
    "className": "hl_green"
  },
  {
    "color": "#5ac8fa",
    "caption": "Teal Blue",
    "className": "hl_tblue"
  },
  {
    "color": "#007aff",
    "caption": "Blue",
    "className": "hl_blue"
  },
  {
    "color": "#5856d6",
    "caption": "Purple",
    "className": "hl_purple"
  },
  {
    "color": "#ff2d55",
    "caption": "Pink",
    "className": "hl_pink"
  }
]